Product:
WonderPlugin Carousel 12.8 or above
Tutorial:
This tutorial will guide you how to create a WordPress carousel from images and videos inside a web folder. It will also show you how to dynamically define the web folder in the carousel shortcode so you can specify a different web folder on the post/page where the carousel is added.
Contents:
- Step 1 - Upload image and video files to a folder on your WordPress web server
- Step 2 - Create a carousel by using WonderPlugin Carousel
- Step 3 - Add the carousel shortcode to a WordPress post or page
- Step 4 - Use list.xml file to define extra title and description information
- Step 5 - Use list.xml file to add YouTube and Vimeo videos
- Extra - Dynamically define the image import folder
Step 1 - Upload image and video files to a folder on your WordPress web server
For image, the plugin supports jpg, jpeg, gif and png files.
For video, the plugin supports mp4 and m4v files.
If myimage.jpg and myimage-thumb.jpg are found in the folder, myimage-thumb.jpg will be used as the thumbnail of the image.
If myvideo.mp4, myvideo-thumb.jpg and myvideo-poster.jpg are found in the folder, myvideo-thumb.jpg will be used as the thumbnail, myvideo-poster.jpg will be used as the poster image.
Step 2 - Create a carousel by using WonderPlugin Carousel
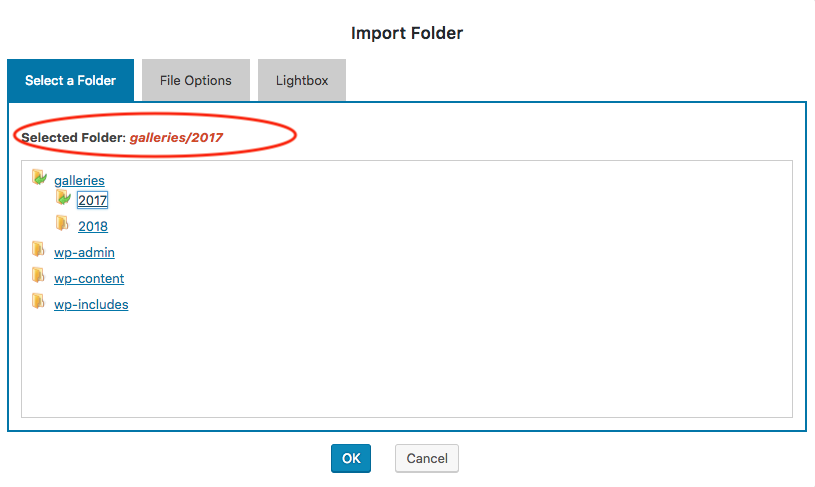
In WonderPlugin Carousel, create a new carousel, in step 1, click the button "Import Folder".
In the "Import Folder" dialog, select the folder where you have uploaded the image and video files.
Please note, the plugin will only search files in the selected folder, it will not loop through its subfolders.
Step 3 - Add the carousel shortcode to a WordPress post or page
Save the carousel and add the generated shortcode to a WordPress post or page. For more information about how to use the plugin, please view the quick start tutorial: How to create a WordPress carousel.
An online demo is as follows:


Step 4 - Use list.xml file to define extra title and description information
You can use an xml file to define extra information, for example, title and description, for the images and videos in the folder.
The name of the xml file must be list.xml and it must be placed inside the folder.
For example, the following xml file adds extra information for two items in the carousel.
The first item myimage.jpg defines title and description for the image myimage.jpg.
The second item myvideo-poster.jpg defines title and description for the video myvideo.mp4, because the image myvideo-poster.jpg is the poster image of this video.
Please note, you need to use xml key image to add extra information to an image/video in the folder, and the filename must match.
<list>
  <item>
    <image>myimage.jpg</image>
    <title>Image Title</title>
    <description>Denique liberavisse cu duo, no mea iusto rationibus. At pro choro feugait epicuri, vero ponderum patrioque mel ei.</description>
  </item>
  <item>
    <image>myvideo-poster.jpg</image>
    <title>Video Title</title>
    <description>Denique liberavisse cu duo, no mea iusto rationibus. At pro choro feugait epicuri, vero ponderum patrioque mel ei.</description>
  </item>
</list>
Step 5 - Use list.xml file to add YouTube and Vimeo videos
You can also use the list.xml file to add YouTube and Vimeo videos to the carousel.
For example, the following xml content add one YouTube video and one Vimeo video to the carousel. The type of a Youtube video is 2, the type of a Vimeo video is 3.
<list>
  <item>
    <type>2</type>
    <image>https://img.youtube.com/vi/wswxQ3mhwqQ/0.jpg</image>
    <video>https://www.youtube.com/embed/wswxQ3mhwqQ</video>
    <title>YouTube</title>
    <description>WonderPlugin Carousel</description>
  </item>
  <item>
    <type>3</type>
    <image>https://i.vimeocdn.com/video/545650849_640.jpg</image>
    <video>https://player.vimeo.com/video/147079122</video>
    <title>Vimeo</title>
    <description>WonderPlugin Carousel</description>
  </item>
</list>
Extra - Dynamically define the image import folder
You can also dynamically define a folder in the carousel shortcode so you can specify a different web folder on the post/page where the carousel is added.
For example:
[[wonderplugin_carousel id="55" data-importfolder="galleries/2018"]]
Please note, the carousel itself must be an "Import folder" gallery, otherwise the attribute data-importfolder will not work. The value of data-importfolder should be the relative path to the WordPress root folder. If you don't know the value of your selected folder, you can goto the plugin, select the folder in the "Import Folder" dialog, and copy the value of the "Selected folder".
