This tutorial will guide you how to create a WordPress video player with subtitles or closed captions.
There are three steps in this tutorial:
- Step 1 - Install Wonder Gallery
- Step 2 - Add mp4 video file and vtt subtitle file to the gallery
- Step 3 - Publish the video player
At the end of this tutorial, we will create a video player as follows:
Step 1 - Install Wonder Gallery
First please install the WordPress premium plugin Wonder Gallery. You can download the free version from the plugin home page, test it, make sure it works for you before upgrading to the commercial version.
Step 2 - Add mp4 video file and vtt format subtitle file to the gallery
After you have installed Wonder Gallery, in your WordPress backend, left menu, goto Wonder Gallery -> New Gallery, create a new gallery.
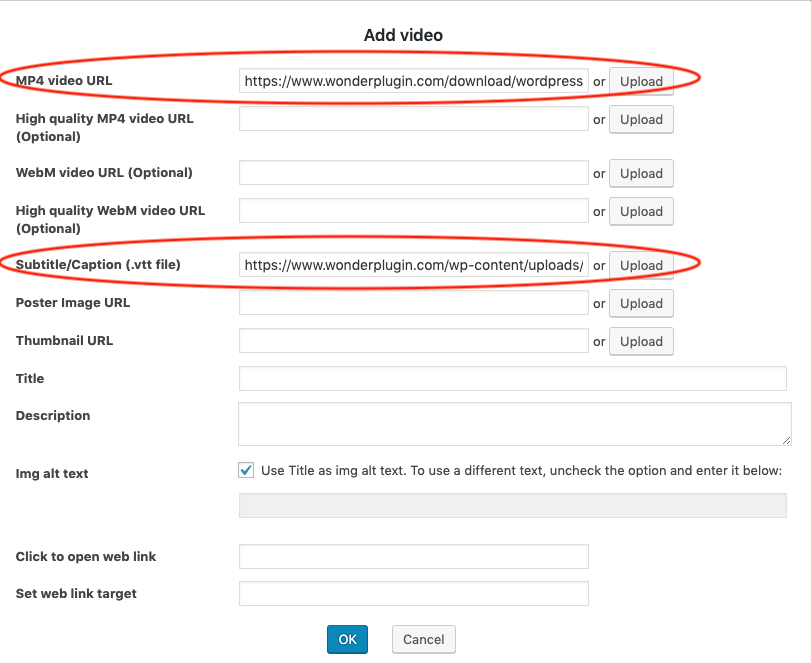
In the gallery editor, step 1, click the button "Add Video". In the Add Video dialog, select or upload an mp4 video file, in the Subtitle/Caption (.vtt file) input box, upload a .vtt subtitle track file.
If a .vtt file is provided, the video captions will be displayed by default. To close the video captions by default, in the gallery editor, step 3 Options tab, Advanced Options, add the following code to the Data Options input box:
data-showsubtitlebydefault="false"
A .vtt file or WebVTT (Web Video Text Tracks Format) file defines the subtitles or captions for video content.
A .vtt file is a text file, you can create the file or edit it with a text editor. An example is as follows:
WEBVTT

00:01.000 --> 00:20.000
Wonder Carousel - Responsive WordPress Carousel Plugin

00:20.000 --> 00:40.000
Wonder Carousel is the best WordPress carousel plugin to create WordPress image and video carousel.

00:40.000 --> 01:00.000
Support WordPress posts, custom post types, WooCommerce, images, Mp4 and WebM videos, YouTube and Vimeo.
At the beginning of the file, there is a line WEBVTT, then each paragraph defines the time span and the subtitle. For example, the above .vtt file adds three captions to the video content, from 1 second to 20 second, 20 second to 40 second and 40 second to 1 minute.
For more information about vtt file format, please view the document: WebVTT: The Web Video Text Tracks Format.
To customise the CSS style of the closed caption, you can add the following code to the plugin, step 3 Options tab, Advanced Options, Custom CSS input box:
video::cue {
    background-color: rgba(0,0,0,0.1) !important;
    color: #ff0000 !important;
    font-size: 24px !important;
}

video::-webkit-media-text-track-display-backdrop {
    background-color: rgba(0,0,0,0.1) !important;
}
Step 3 - Publish the video player
After you have added the video file and the .vtt file to the gallery, click the Save & Publish button and save the gallery. The plugin will publish the gallery and display its shortcode.
To add the video player to a WordPress page or post, copy the shortcode and add it to the page or post.
