This tutorial will guide you how to create WordPress tabs from an XML file. There are 4 steps in this tutorial:
- Step 1 - Install Wonder Tabs
- Step 2 - Create an XML file
- Step 3 - Upload the XML file to your WordPress web server
- Step 4 - Create WordPress tabs from the XML file URL
Step 1 - Install Wonder Tabs
First please install the plugin Wonder Tabs. You can download the free version from the product home page, test it, make sure it works for you before upgrading to the commercial version.
Step 2 - Create an XML file
Using XML allows you to define content list for your WordPress tabs. An XML file is actually a text file. You can export an existing tab group to an XML file in Wonder Tabs, or you can create the XML file from scratch.
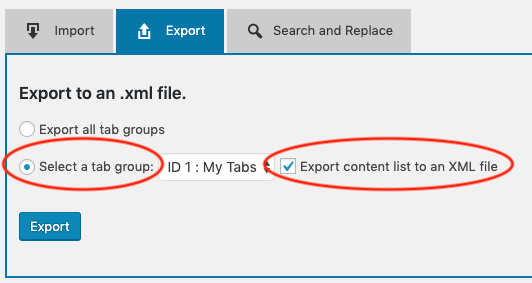
To export a tab group to an XML file, in your WordPress backend, goto left menu Wonder Tabs -> Import/Export. In the Export tab, choose the option "Select a tab group", select a tab group, check the option "Export content list to an XML file", then click the button "Export".
You can also create the XML file by using an XML editor. The format of the gallery XML file is as follows:
<list>
	<item>
		<type>0</type>
		<tabtitle><![CDATA[Tab 1]]></tabtitle>
		<tabcontent><![CDATA[Content for tab 1]]></tabcontent>
		<pageid>-1</pageid>
		<tabicon>fontawesome</tabicon>
		<tabiconfontawesome>fa-birthday-cake</tabiconfontawesome>
		<tabiconimage></tabiconimage>
		<tabiconimagewidth>48</tabiconimagewidth>
		<tabiconimageheight>48</tabiconimageheight>
	</item>
	<item>
		<type>0</type>
		<tabtitle><![CDATA[Tab 2]]></tabtitle>
		<tabcontent><![CDATA[Content for tab 2]]></tabcontent>
		<pageid>-1</pageid>
		<tabicon>fontawesome</tabicon>
		<tabiconfontawesome>fa-group</tabiconfontawesome>
		<tabiconimage></tabiconimage>
		<tabiconimagewidth>48</tabiconimagewidth>
		<tabiconimageheight>48</tabiconimageheight>
	</item>
</list>
The above XML adds two tabs. You could use <![CDATA[ and ]]> around the XML value to escape the text.
The available XML keys are as follows:
| Key | Description |
|---|---|
| type | 0: text/html code content 1: page tab |
| tabtitle | title of the tab |
| tabcontent | content of the tab |
| pageid | ID of the page if the type equals 1 |
| tabicon | image: use the value of tabiconimage as image URL of the icon fontawesome: use the value of tabiconfontawesome as the icon |
| tabiconfontawesome | fontawesome icon |
| tabiconimage | icon image URL |
| tabiconimagewidth | width of the icon image |
| tabiconimageheight | height of the icon image |
Step 3 - Upload the XML file to your WordPress web server
By default, WordPress does not allow you to upload an XML file to the Media Library, so you need to upload the XML file to your web server via FTP.
You can create a folder in your WordPress ftp server, upload the XML file to this folder, then get the URL of the file. For example, if you create a folder xmlfiles in your WordPress folder, you upload the XML file wonderplugin_tabs_filelist_1.xml to this folder, the URL will look like:
http://www.yourdomain.com/xmlfiles/wonderplugin_tabs_filelist_1.xml
Please test your URL by visiting it with your web browser and make sure it works before proceeding to the next step. If the URL works fine, it will display the XML file content.
Step 4 - Create WordPress tabs from the XML file
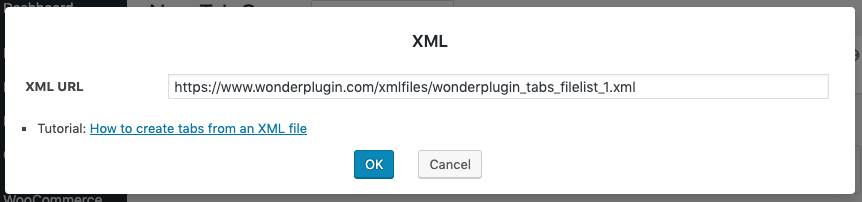
Once you have confirmed the XML file URL is correct, In Wonder Tabs, create a new tab group, in step 1, click the button Import XML, and enter the XML file URL.
Publish the tab group, add the generated shortcode to a WordPress page or post.
