From time to time, you may want to limit part of a WordPress page or post content to specific date or time. For example, you may want to display some content only during holidays.
This tutorial will guide you how to add start time and end time to schedule the content so it will only be displayed in the specified date and time.
There are 3 steps in this tutorial:
- Step 1 - Install WordPress plugin Conditional Display for Mobile
- Step 2 - Check WordPress Local Time
- Step 3 - Add conditional display shortcode around your existing WordPress content
Step 1 - Install WordPress plugin Conditional Display for Mobile
Conditional Display for Mobile is a mobile detect plugin that can be used to control what content is displayed depending on the visitor’s device or web browser, for example, you can use it to only display some content on mobile devices. The plugin also supports adding start time and end time to schedule the content so it will only be displayed in the specified date and time.
The plugin is free, to install it, in your WordPress backend, goto left menu, Plugins -> Add New, search "Conditional Display for Mobile", install and activate the plugin.

Step 2 - Check WordPress Local Time
The scheduled start and end time will be compared to the WordPress Local Time.
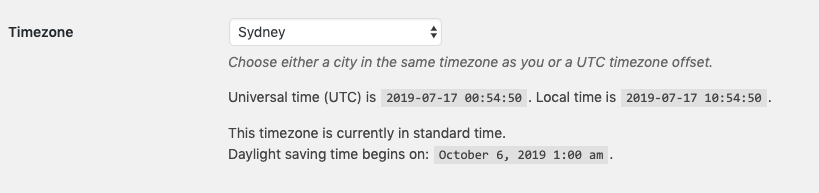
In your WordPress backend, goto left menu Settings -> General, please check the Timezone setting, select a city in the same timezone as you or a UTC timezone offset, and make sure the Local Time is correct.
Step 3 - Add conditional display shortcode around your existing WordPress content
To control the content display, you can add shortcode [wonderplugin_cond] and [/wonderplugin_cond] around your content, then use the supported attributes to control whether to display the content.
For time schedule, the plugin supports two attributes: starttime and endtime. starttime specifies the date and time that the content will start to display, endtime specifies the date and time the content will stop displaying.
Examples are as follows:
[[wonderplugin_cond starttime="2019-07-20" endtime="2019-08-20"]
This content will start to display from July 20, 2019 and end after August 20, 2019 (including the start day and end day).
[/wonderplugin_cond]]
[[wonderplugin_cond starttime="2019-07-20 08:30:00" endtime="2019-08-20 17:30:00"]
This content will start to display from 8:30 July 20, 2019 and end after 17:30 August 20, 2019.
[/wonderplugin_cond]]
[[wonderplugin_cond starttime="2019-07-20"]
This content will start to display from July 20, 2019 (including the day).
[/wonderplugin_cond]]
