Responsive WordPress Carousel

Question:

I am considering purchasing the carousel plugin, and I had a question about functionality. This plugin will only work for me if it can be responsive at multiple breakpoints, and I don't see a setting for that.

What I mean is -- I have it set so that the number of visible items is 4. On wide screens it shows all four items, and there's a breakpoint so that narrow screens only show one item. But there is no in-between -- it goes from one to four, which means that at the medium screen widths, the four items are very squished. I would like to add additional breakpoints so it can go from 1 item, to 2 items, to 3 items, to 4.

Please let me know if this is possible.

Answer:

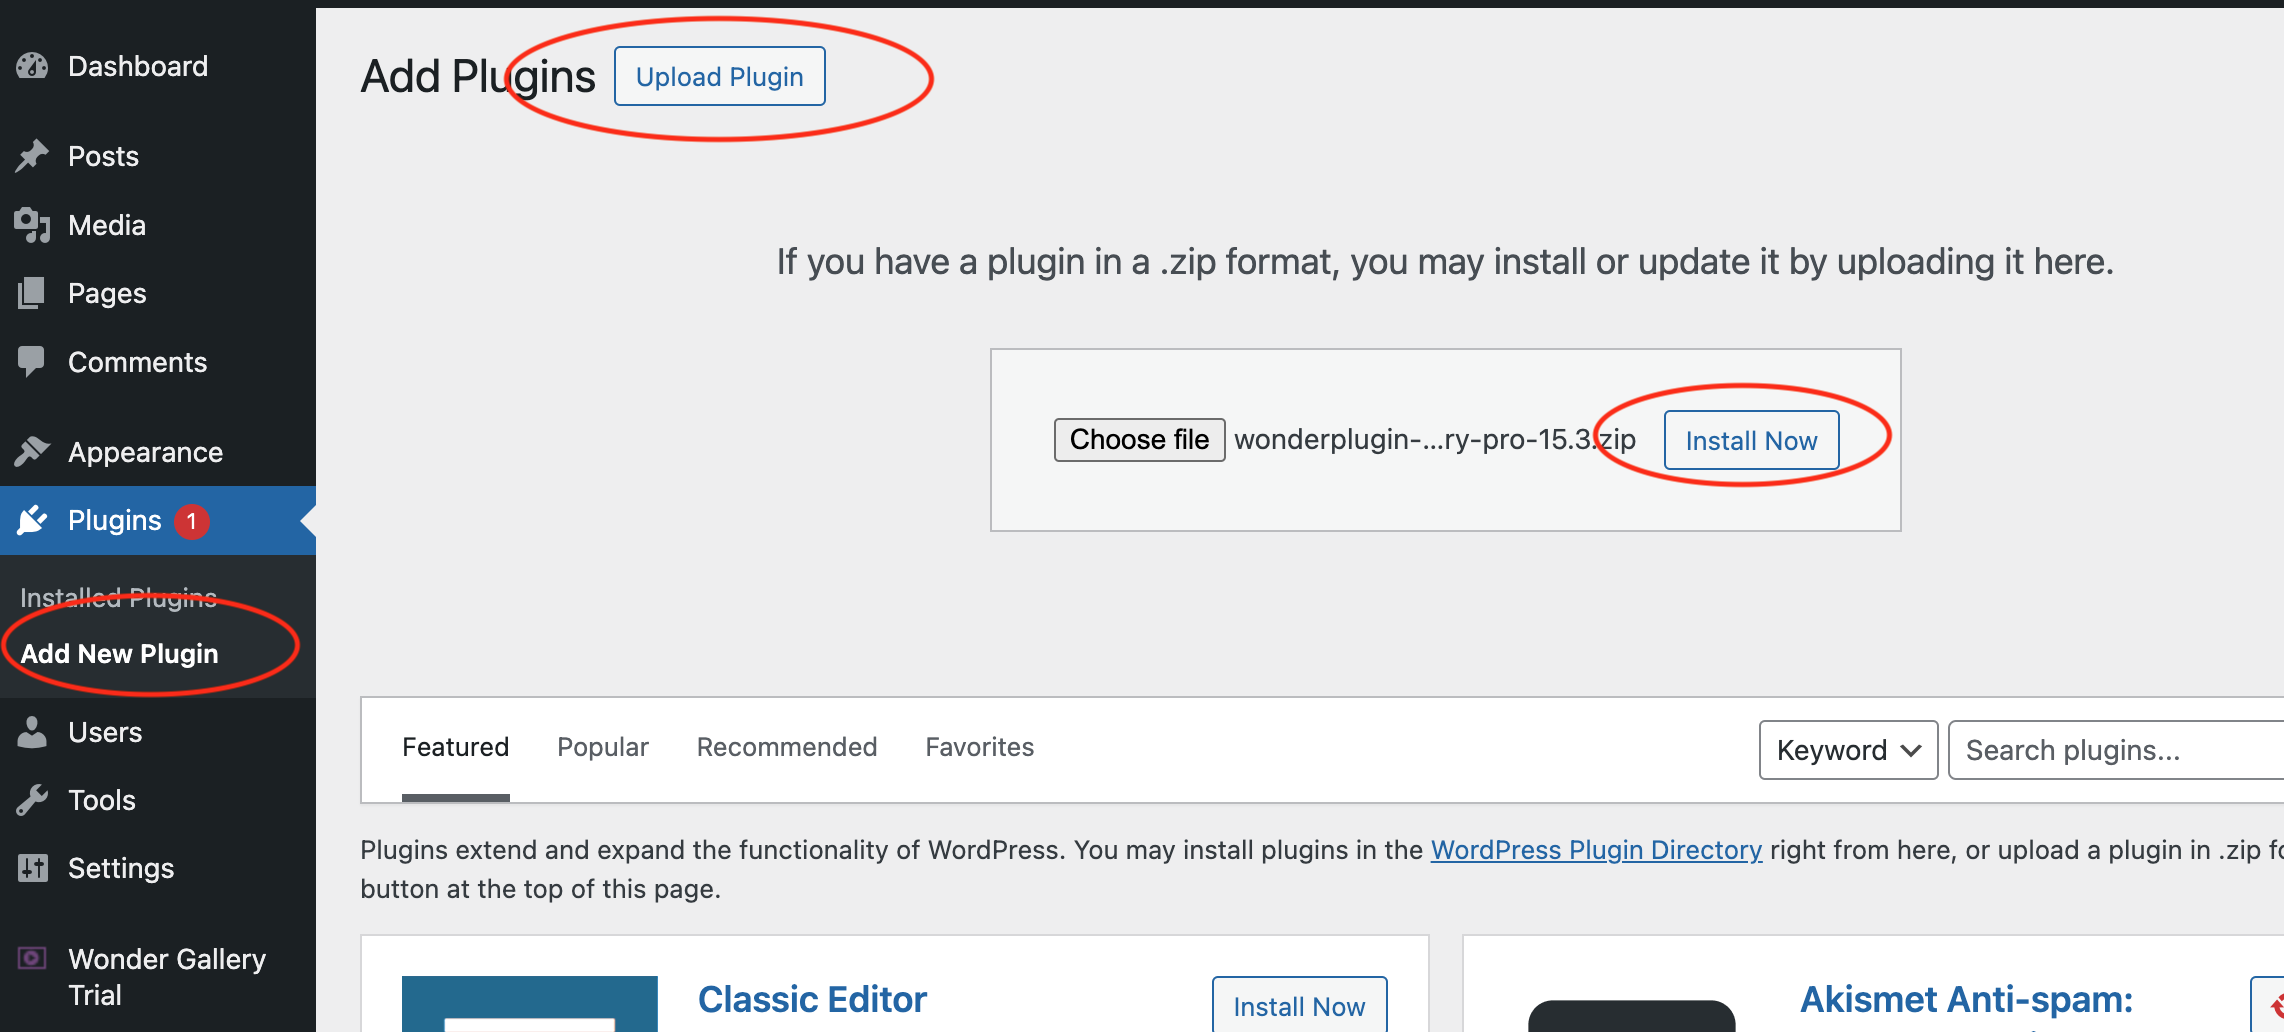
Please goto https://www.wonderplugin.com/wordpress-carousel/ and download the new version 2.1.

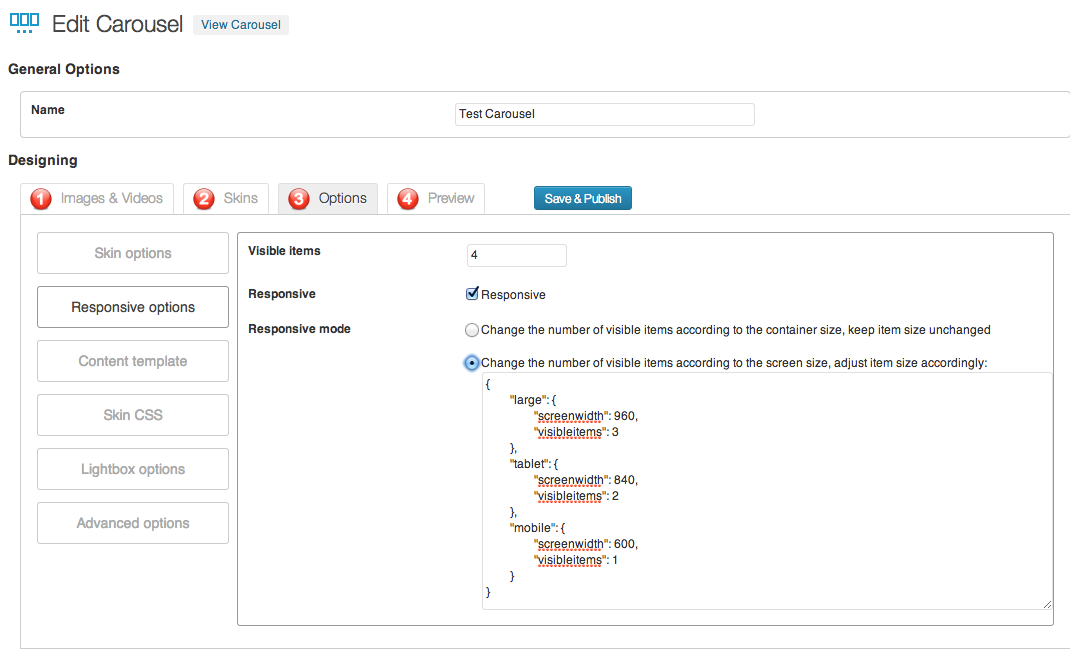
In the new version, step 3, there is a new button "Responsive Options", you can choose the responsive mode "Change the number of visible items according to the container size, keep item size unchanged".

You can also change the number of visible items by using the screen size query.

For example, you can change the default visible items to 4, then use screen query to change it to 3, 2, 1 according to the screen size:

{
  "large": {
    "screenwidth": 960,
    "visibleitems": 3
  },
  "medium": {
    "screenwidth": 800,
    "visibleitems": 2
  },
  "mobile": {
    "screenwidth": 600,
    "visibleitems": 1
  }
}

Please note. The above screen query is a json string, the property name must be wrapped with double quotes.

Responsive WordPress Carousel

How to Manually Upgrade the Plugin Without Losing Existing Work

This tutorial guides you through the process of manually upgrading the plugin to a new version. You can follow these instructions to upgrade from the Free version to the Pro version, or to update either version to the latest release.

Before proceeding with the tutorial, we strongly recommend making a backup of your WordPress website.

There are two methods for manually upgrading the plugin to its latest version:

The First Method

There are 4 steps in this method:

Step 1 - Make sure the keep data option is enabled

In your WordPress backend, goto the left menu Plugin Name (e.g., Wonder Carousel, Wonder Slider, etc) -> Settings, make sure there is an option Keep data when deleting the plugin and the option is checked. The option is checked by default. If your current version is very old, it may not have this option. In this case, do not use this method, use the following second method instead.

Step 2 - Deactivate and delete the old version

In the WordPress backend, goto the left menu Plugins -> Installed Plugins, deactivate the plugin and delete it. When deleting the plugin, ignore the warning "Are you sure you wish to delete these files and data" and click the button "Yes, Delete these files and data". This is a standard warning from WordPress.

Step 3 - Install and activate the new version

In the WordPress backend, goto the left menu Plugins -> Add New, click Upload Plugin, select the downloaded new version plugin zip file, install and activate it.

Step 4 - Clear WordPress Caches

  • If you have installed a WordPress js/css minify plugin or WordPress cache plugin for example, Autoptimize, W3 Total Cache, WP Rocket, WP Fastest Cache, WP Super Cache, empty all caches from the plugin.
  • Some web hosts, for example, GoDaddy, WPEngine, SiteGround, DreamHost, will also cache web files. You need to clear caches of the web hosting before testing. Please contact your web hosting provider and ask about how to clear caches.
  • Clear caches of your web browser before testing

The Second Method

If you are using a very old version, you may need to use this method to upgrade the plugin. There are 3 steps in this method:

Step 1: Install the new version plugin via FTP

First please extract the new version plugin ZIP file to a folder on your computer, then upload the extracted Plugin folder to the wp-content/plugins folder in your WordPress FTP server.

When a ZIP file is extracted, some unzip software may add a parent folder outside of the Plugin folder. Please make sure you have uploaded the Plugin folder, not its parent folder.

If your WordPress already has an old version installed, make sure to overwrite the existing folder in the server. Or you can delete the old version files first then upload the new version files.

Step 2: Make sure the plugin is activated

In your WordPress backend, left menu, Plugins -> Installed Plugins, find the plugin from the list, make sure the plugin is activated. If it's not, click the Activate link.

Step 3 - Clear WordPress Caches

  • If you have installed a WordPress js/css minify plugin or WordPress cache plugin for example, Autoptimize, W3 Total Cache, WP Rocket, WP Fastest Cache, WP Super Cache, empty all caches from the plugin.
  • Some web hosts, for example, GoDaddy, WPEngine, SiteGround, DreamHost, will also cache web files. You need to clear caches of the web hosting before testing. Please contact your web hosting provider and ask about how to clear caches.
  • Clear caches of your web browser before testing

WordPress Carousel on RTL webpage

Question:

I installed the carousel plugin, and everything is fine, apart from the fact the the click on the errows (right and left) doesnt move the carousel...

Answer:

It's because the direction of your webpage is rtl. To fix the problem, you can try to add the following CSS code to your WordPress theme CSS file:

.wonderplugincarousel {
   direction: ltr;
}

Add link to WordPress carousel image

Question:

I was considering buying the WordPress carousel plugin. I downloaded the free version, and it won’t allow me to set a URL for the images to redirect to when clicked. The option is greyed out. Is this feature specific to the commercial version, or am I doing something wrong? Thanks!

Answer:

Please uncheck the option "Open current image in Lightbox", then the link and target fields will be enabled.

Wordpress carousel image link

Change font, size and color of carousel thumbnail labels

Question:

We are considering buying your WordPress Carousel plugin but before we do, I need to know that you can change the thumbnail labels globally to a different font/size/colour and also how you go about writing the custom CSS, i.e. list of ids and classnames.

Answer:

We don't have a list of ids and classnames. You can use Firebug https://getfirebug.com/ or Google Chrome Developer Tools to find out the id or the classname you are interested.

To change font, size and color of the thumbnail labels, you can goto Step 3, Options tab, click Skin CSS button, then change the CSS.

Add link to carousel image

Question:

I have created the carousel using your wordpress carousel plugin, but the option to link the image to a URL is not accessible – it remain grey – please can you help me here.

Answer:

You need to uncheck the option "Open current image in LightBox", then you can enter the weblink and the link target.

wordpresscarousellink

Control timing of WordPress carousel

Question:

Is there a way to control the timing of the carousel? The images changes a little too fast so I just want to know if I can make a timing change of the carousel.

Answer:

Yes.

In the plugin, carousel editor, step 3 Options tab, click Advanced Options, then in the Advanced Options field, enter:

data-interval="1000" data-transitionduration="500"

The data-interval specifies the time interval (in milliseconds) between each animation, the data-transitionduration defines the speed of each animation (the transition duration in milliseconds).