This tutorial will show you how to schedule images and videos in a WordPress gallery so the images and videos will only be displayed between the specified date and time.
There are 4 steps in this tutorial:
- Step 1 - Check Timezone setting in WordPress
- Step 2 - Install Wonder Gallery
- Step 3 - Create new gallery and setup images and videos schedule
- Step 4 - Publish the gallery and add it to WordPress page or post
Step 1 - Check Timezone setting in WordPress
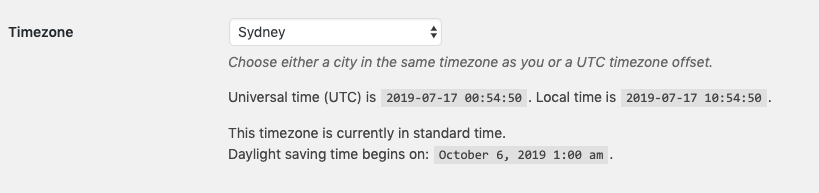
First in your WordPress backend, goto left menu Settings -> General, please check the Timezone setting, select a city in the same timezone as you or a UTC timezone offset, and make sure the Local Time is correct.
In this tutorial, the scheduled start and end time will be compared to the WordPress Local Time.
Step 2 - Install Wonder Gallery
In this step, please install the premium WordPress plugin Wonder Gallery. You can download the free version from the plugin home page, test it, make sure it works for you before upgrading to the commercial version.
Step 3 - Create new gallery and setup images and videos schedule
After you have installed Wonder Gallery, in your WordPress backend, goto left menu Wonder Gallery -> New Gallery, create a new gallery.
Wonder Gallery supports images, HTML5 videos, YouTube, YouTube playlist, Vimeo, DailyMotion and iframe videos. You can add all types of medias and create mixed content gallery.
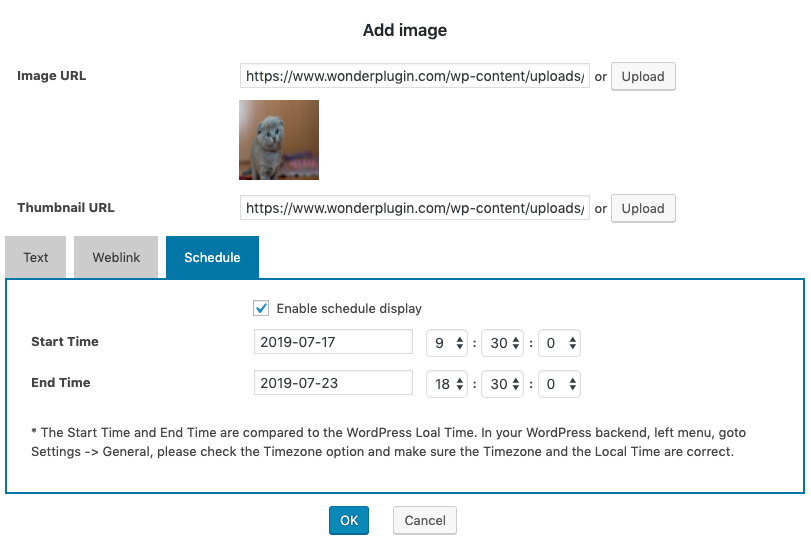
In step 1, click the Add Image or Add Video button, in the Add Image or Add Video dialog, click the Schedule tab. You can specify the start date/time and the end date/time for the image or the video to be displayed.
Step 4 - Publish the gallery and add it to WordPress page or post
After you have added all images and videos to the gallery, click the Save & Publish button. The plugin will save the gallery and display its shortcode.
To add the gallery to a WordPress page and post, copy the shortcode and paste it to the page or post editor.
