
WordPress slider is a great way to highlight the contents of your website and call the attention of your website visitors. This tutorial will guide you how to add a slider to your WordPress website.
To add a slider to WordPress, please take the following 5 steps:
- Step 1 Install the plugin Wonder Slider
- Step 2 Create a new slider
- Step 3 Add images, videos and texts to the slider
- Step 4 Select a skin and publish the slider
- Step 5 Add the slider to post, page or the WordPress theme
Step 1 - Install the plugin Wonder Slider
First please install the plugin Wonder Slider. You can download the Free Version from the product homepage, try it, make sure it works for you before upgrading to the commercial version.

For how to install a plugin from the downloaded plugin ZIP file, please view this tutorial: How to install a WordPress plugin from a ZIP file.
Step 2 - Create a new slider
After you have installed and activated Wonder Slider, in your WordPress dashboard, left menu, goto Wonder Slider -> New Slider.
The slider plugin has a wizard-style, step by step and self-explanatory user interface, which makes it very easy to use.
Step 3 - Add images, videos and texts to the slider
In the slider editor, Step 1 Images and Videos tab, you can add images, HTML5 videos, YouTube videos, Vimeo videos and WooCommerce products to the slider. You can add all types of slides and create a mixed content slider.

click to enlarge the image
For HTML5, YouTube and Vimeo videos, you can choose to open the video in a lightbox popup or inside the slideshow.
For images, you can choose to link the image to a weblink or open the image in the lightbox popup.
You can also add WordPress posts and WordPress custom post types to the slider. The plugin will automatically pull featured images from the posts and create a slider dynamically.
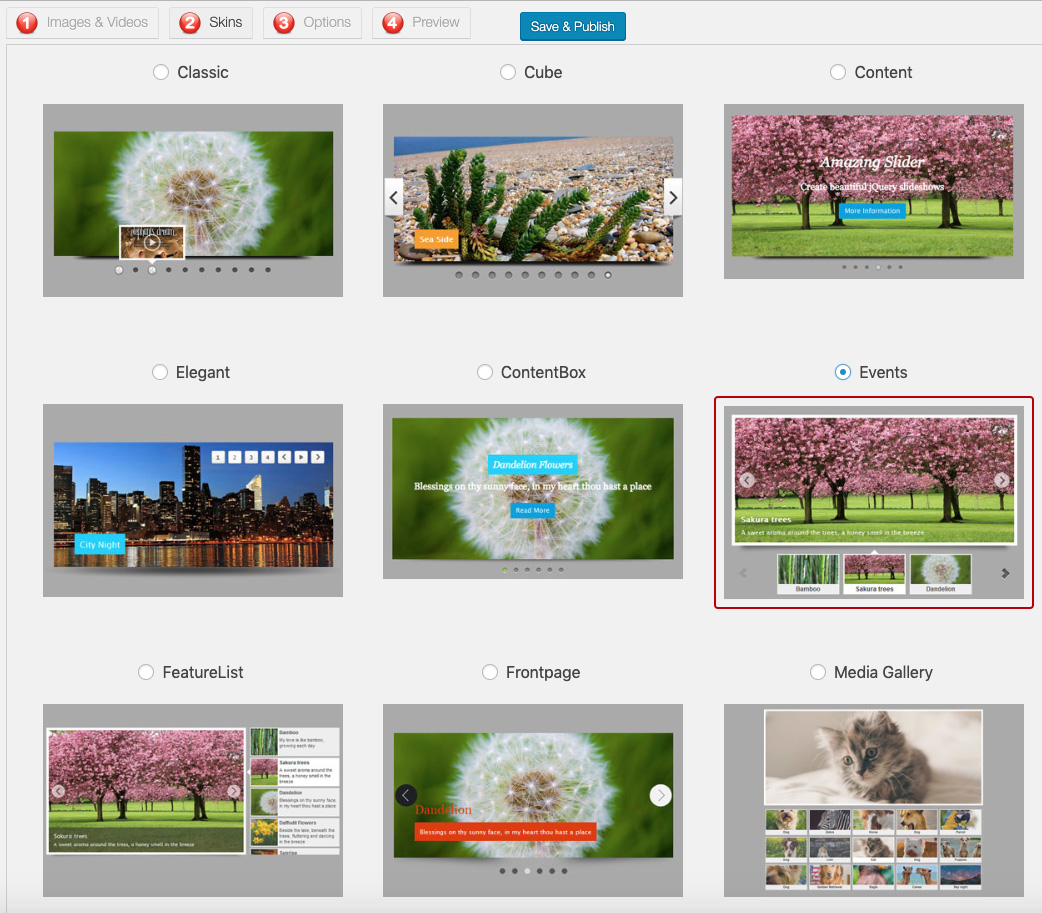
Step 4 - Select a skin and publish the slider
In the plugin slider editor, Step 2 Skins tab, you can select a slider skin from over 30 pre-defined skin templates.
click to enlarge the image
You can select a skin with bullet navigator, number navigator or thumbnails. The thumbnails can be placed on the top, bottom, left or right side of the slider. You can create slider with a thumbnail carousel or multiple-row thumbnails.
After you have finished the slider, click the button Save & Publish to publish the slider.
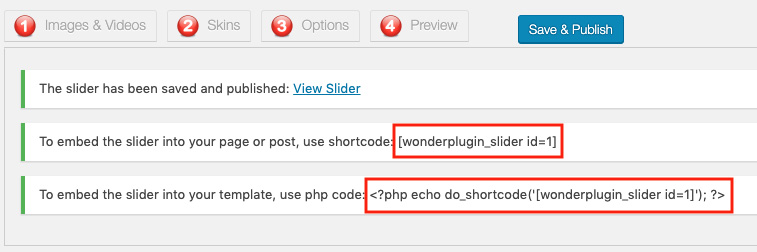
Step 5 - Add the slider to post, page, sidebar widget or the WordPress theme
After you save and publish the slider, the plugin will display a shortcode and a php code snippet.
click to enlarge the image
To embed the slider to a post or page, copy the shortcode and paste it to the page content.
To embed the slider to a sidebar widget, add a Text widget, then add the shortcode.
To embed the slider to the WordPress theme, copy the PHP code snippet and paste it to the theme PHP file. When adding the code, make sure you do not add it between the existing PHP tags <?php and ?> tags in the template php file. Nested PHP open and close tags will break the PHP.
