Product:
Tutorial:
Contact Form 7 is a popular WordPress form plugin. This tutorial will guide you how to open a form created with Contact Form 7 in the Wonder Popup plugin.
Continue reading
Recently Asked Questions and WordPress Tutorials
Product:
Tutorial:
Contact Form 7 is a popular WordPress form plugin. This tutorial will guide you how to open a form created with Contact Form 7 in the Wonder Popup plugin.
Continue reading
Product:
Tutorial:
This tutorial will guide you how to use a button or text link to trigger a WordPress popup created with the plugin Wonder Popup. At the end of this tutorial, we will also show you how to trigger the popup using a button created with the plugin MaxButtons https://wordpress.org/plugins/maxbuttons/.
Continue reading
Product:
All Wonder Plugins
Tutorial:
By default, Wonder plugins load the plugin JS files in the WordPress header. While this provides best compatibility with all kinds of WordPress themes, JS files in the header will be render-blocking. That's, the webpage will only be rendered after the JS files are loaded.
There are two methods to load the JS files as non-render blocking and fix the issue.
We will also discuss plugin conditional loading at the end of this tutorial:
Wonder Popup is a premium WordPress plugin to create lightbox popups that can help you get more newsletter subscribers, promote new products, deliver special offers or show videos to your customers.
This tutorial will guide you how to show the popup only on specified custom post types posts.
Continue reading
In this tutorial, first we will learn how to create a WordPress gallery with multiple categories. A demo created with the tutorial is as follows: WordPress Gallery with Category Filter. You can click the category buttons on top of the WordPress gallery to show different categories.
In some cases, you may want to add the same WordPress gallery to other webpages, but only want to display one of the category. In the second part of the tutorial, we will learn how to only display one of the categories by using gallery shortcode attributes.
Continue reading
This tutorial will guide you how to send automated welcome email to MailChimp subscribers that subscribed from WordPress popup forms created with the Wonder Popup plugin.
Wonder Popup is a WordPress popup plugin to create lightbox popup forms, embed forms, corner slide-in forms and notification bars that can help you get more newsletter subscribers.
For how to create an email subscription popup form with Wonder Popup, please view the tutorial: How to create WordPress email subscription popup for MailChimp.
Continue reading
Product:
WonderPlugin Popup Version 6.0
Tutorial:
This tutorial will guide you how to add a custom drop-down list to the popup form.
Continue reading
Product:
Question:
I am trying to have a pop up only display on WooCommerce product pages, that's, I want a pop up to only show on pages http://www.mysite.com/product/XXXXX.
Continue reading
Product:
WonderPlugin Popup Version 5.6 and above
Tutorial:
Divi Builder is a drag and drop page builder by Elegant Themes. This tutorial will show you how to open an email subscription form created with WonderPlugin Popup when clicking a Divi button.
Continue reading
This tutorial will guide you how to trigger a popup on clicking a button in WordPress. You can use the popup to display an email opt-in or newsletter subscription form, promote new products, deliver special offers or show videos to your visitors.
There are 4 steps in this tutorial:
A demo created with this tutorial is as follows:
First please install the plugin Wonder Popup. You can download the Free Version from the product homepage, try it, make sure it works for you before upgrading to the commercial version.
For how to install a plugin from the downloaded plugin ZIP file, please view this tutorial: How to install a WordPress plugin from a ZIP file.
After you have installed the WordPress plugin Wonder Popup, in your WordPress backend, left menu, goto Wonder Popup -> Add New.
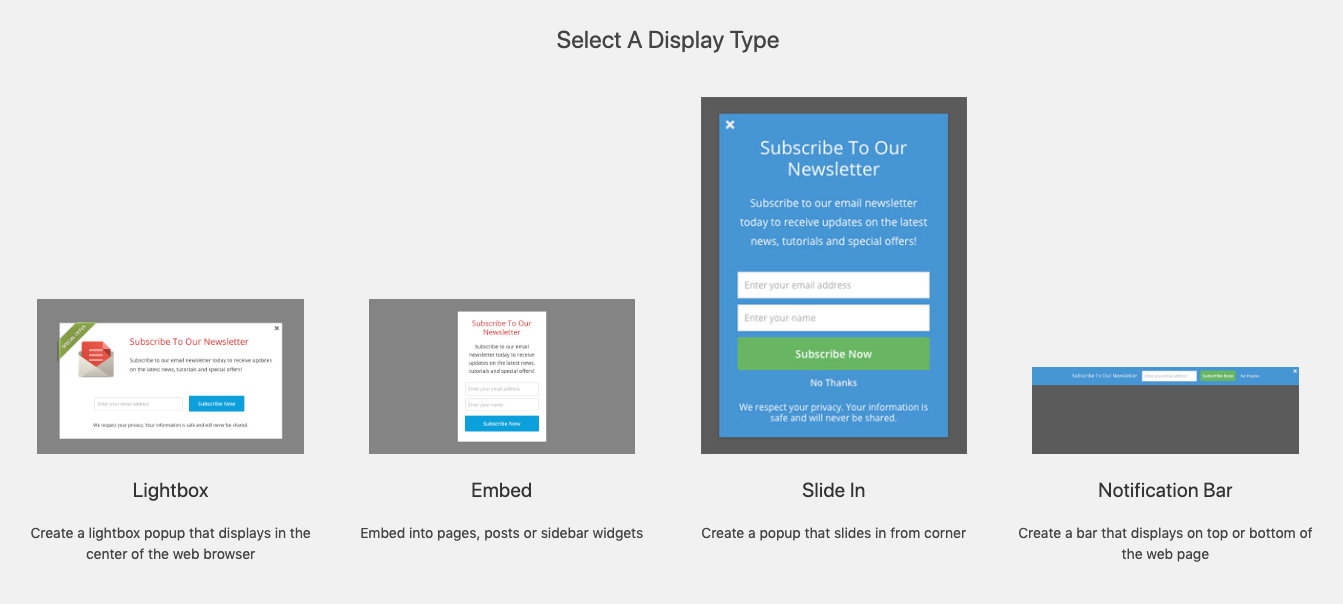
In the New Popup page, you can select from 4 types of forms:
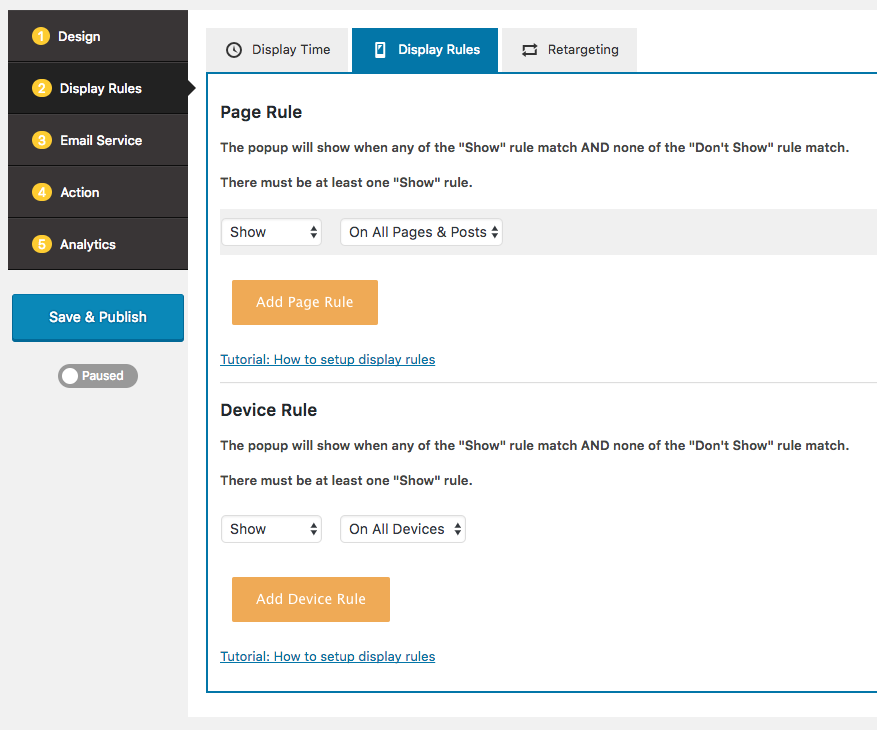
In the popup editor, step 3 Display Rules -> Display Rules tab, make sure the popup is enabled on the page or post that you are going to add the button.
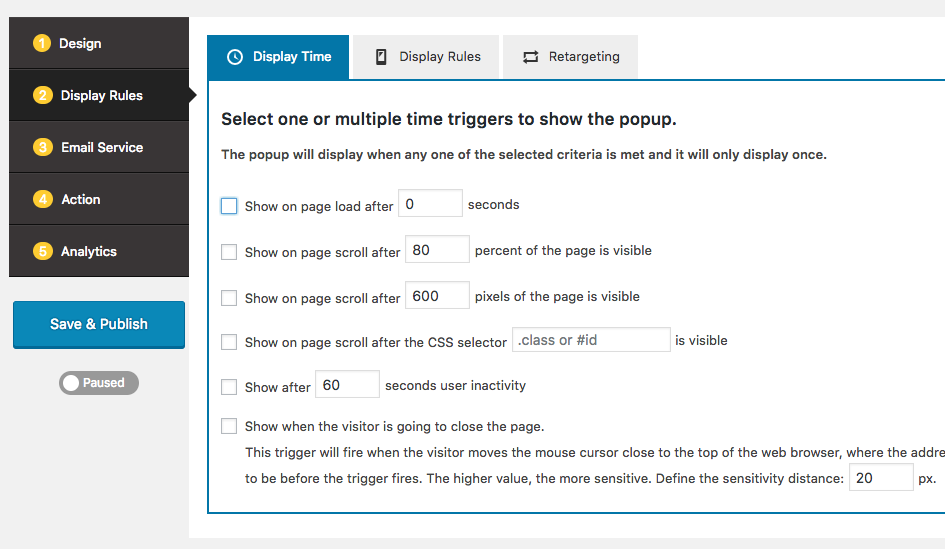
If you don't like the popup to show up automatically, in the popup editor, step 3 Display Rules -> Display Time, uncheck all options.
In the page or post that you are going to add the button, switch to Text edit mode, add the following code to create a button that will tigger the popup on click.
<a href="#" class="wppopup" data-popupid=1><button>Show Popup</button></a>
Please make sure to change value of data-popupid to the ID of your own popup.
