Change title font size of WordPress Gallery

Question:

I am working for my client to build a WP site and they have purchased the Wonderplugin Video Gallery Commercial plugin. I have activated it and want to reduce the text size in the Title. I have attached a screengrab to this email, as the site is on a test site and cannot be viewed by anyone but me yet. Can you please let me know what to do?

Answer:

In Step 3, Options tab, click Advanced Options button, then enter the following text to the Advanced Options field:

data-titlecss="{color:#ffffff; font-size:12px; font-family:Armata, sans-serif, Arial; overflow:hidden; white-space:normal; text-align:left; padding:10px 0px;}"
data-descriptioncss="{color:#ffffff; font-size:10px; font-family:Armata, sans-serif, Arial; overflow:hidden; white-space:normal; text-align:left; padding:0px 0px 10px 0px;}"

A demo is as following:

Multiple jQuery loaded in WordPress

Question:

I have a website in progress, I used Wonderplugin for WordPress and as I came across on the development, I cannot get it working.

I already uploaded images and configured everything on WordPress.

I also copied the shortcode to the php page that I am working on. But the carousel does not show up.

Answer:

Normally this problem is that there are multiple jQuery files added to your WordPress.

You can view the HTML source code of your webpage, and check how many jQuery are added in your website. In Google Chrome, you can view the HTML source code with menu View -> Developer -> View Source, then search text "jquery" in the source code.

There should be only one jQuery in the webpage, which is added by the WordPress system.

Some plugins add their own jQuery to the website, and this is not correct. A plugin should always use the system installed jQuery, and the js files added from a plugin will be added after the system jQuery.

A jQuery will destroy all other jQuery functions that are added before it. So if a plugin adds its own jQuery, it may destroy other jQuery functions.

To fix the issue:

In the plugin, Setting menu, you can try to check the option "Add plugin js scripts to the footer". This option will place the plugin js file to the footer and will fix the problem in most cases.

If the above option is not working, you can try to disable all other plugins and see whether the WonderPlugin works. If it works, you can then enable the plugins one by one, and find the plugin that has caused the problem.

If WonderPlugin is still not working after you have disabled all other plugins, then the extra jQuery may have been added manually to the theme or the page, you need to find the code and remove it.

Show description under the video for WordPress Gallery Vertical Skin

Question:

I am using the WonderPlugin Gallery Version 2.0.

Is there a way to show the description of the video under the video being played in the gallery ? I am using the Vertical Skin.

Thanks

Answer:

Yes, in step 2, Options tab, click the button Advanced Options, then enter the following text to the right side Advanced Options field:

data-showdescription="true"
data-titleheight="80"

A demo is as following:

How to Manually Upgrade the Plugin Without Losing Existing Work

This tutorial guides you through the process of manually upgrading the plugin to a new version. You can follow these instructions to upgrade from the Free version to the Pro version, or to update either version to the latest release.

Before proceeding with the tutorial, we strongly recommend making a backup of your WordPress website.

There are two methods for manually upgrading the plugin to its latest version:

The First Method

There are 4 steps in this method:

Step 1 - Make sure the keep data option is enabled

In your WordPress backend, goto the left menu Plugin Name (e.g., Wonder Carousel, Wonder Slider, etc) -> Settings, make sure there is an option Keep data when deleting the plugin and the option is checked. The option is checked by default. If your current version is very old, it may not have this option. In this case, do not use this method, use the following second method instead.

Step 2 - Deactivate and delete the old version

In the WordPress backend, goto the left menu Plugins -> Installed Plugins, deactivate the plugin and delete it. When deleting the plugin, ignore the warning "Are you sure you wish to delete these files and data" and click the button "Yes, Delete these files and data". This is a standard warning from WordPress.

Step 3 - Install and activate the new version

In the WordPress backend, goto the left menu Plugins -> Add New, click Upload Plugin, select the downloaded new version plugin zip file, install and activate it.

Step 4 - Clear WordPress Caches

  • If you have installed a WordPress js/css minify plugin or WordPress cache plugin for example, Autoptimize, W3 Total Cache, WP Rocket, WP Fastest Cache, WP Super Cache, empty all caches from the plugin.
  • Some web hosts, for example, GoDaddy, WPEngine, SiteGround, DreamHost, will also cache web files. You need to clear caches of the web hosting before testing. Please contact your web hosting provider and ask about how to clear caches.
  • Clear caches of your web browser before testing

The Second Method

If you are using a very old version, you may need to use this method to upgrade the plugin. There are 3 steps in this method:

Step 1: Install the new version plugin via FTP

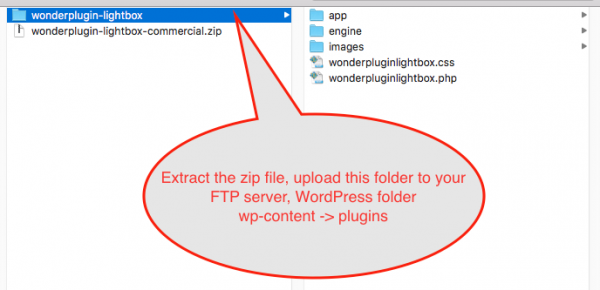
First please extract the new version plugin ZIP file to a folder on your computer, then upload the extracted Plugin folder to the wp-content/plugins folder in your WordPress FTP server.

When a ZIP file is extracted, some unzip software may add a parent folder outside of the Plugin folder. Please make sure you have uploaded the Plugin folder, not its parent folder.

If your WordPress already has an old version installed, make sure to overwrite the existing folder in the server. Or you can delete the old version files first then upload the new version files.
Step 2: Make sure the plugin is activated

In your WordPress backend, left menu, Plugins -> Installed Plugins, find the plugin from the list, make sure the plugin is activated. If it's not, click the Activate link.

Step 3 - Clear WordPress Caches

  • If you have installed a WordPress js/css minify plugin or WordPress cache plugin for example, Autoptimize, W3 Total Cache, WP Rocket, WP Fastest Cache, WP Super Cache, empty all caches from the plugin.
  • Some web hosts, for example, GoDaddy, WPEngine, SiteGround, DreamHost, will also cache web files. You need to clear caches of the web hosting before testing. Please contact your web hosting provider and ask about how to clear caches.
  • Clear caches of your web browser before testing

Continuous YouTube Playing Demo

Please watch the demo at: https://www.wonderplugin.com/wordpress-gallery/continuous-youtube-playing-demo/

The demo is created with WonderPlugin Gallery Plugin.

To play YouTube video continuously, in the plugin, Step 3, Options, tab, check the option "Auto slide" and "Automatically play video".

Please note, this feature won't work on mobile and tablet devices, for example iPhone, iPad and Android. It also won't work on old web browsers, for example, Internet Explorer 8.

Disable right click on HTML5 video

Product

WonderPlugin Gallery

Question:

I need to deactivate the functionality which occurs when you right click on a video. It gives you the option to ‘download video’ I need to turn this off for copyright reasons. I know there are always ways and means to download video content if you want it badly enough, but having a download option when you right click is something I really need to turn off!

Answer:

The right click menu is a function of the web browser. To disable it, in WonderPlugin Gallery plugin, edit the gallery, in step 3 Options tab, Advanced Options, add the following code to Custom JavaScript input box:

jQuery(document).ready(function(){
   jQuery('body').on('contextmenu', 'video', function() { return false; });
});

One MP4 format to play in all web browsers and devices

Product:

Wonder Gallery

Question:

Can I only use one mp4 video format to play in all web browsers?

Answer:

Yes, with our WordPress gallery plugin Wonder Gallery, you only need to provide one mp4 format to play in all web browsers and devices.

In iPhone, iPad, Android, Chrome, Safari, Firefox, Opera, IE 10 and above, the gallery plugin will use HTML5 to play the mp4 video.

In legacy web browsers, for example, Internet Explorer 8 and 9, the gallery plugin will use Flash to play the mp4 video.

If your mp4 video does not play in the web browsers and devices, it's probably because the video is not HTML5 compatible. You can view this tutorial to convert the video file to HTML5 compatible: How to convert video to HTML5 compatible.

Link target on Images of WonderPlugin Gallery and Grid Gallery

Question:

I would like to put a link on one of my images in a Gallery (and I also want to do the same thing in a Grid). I found two different options in the Edit window of my image in the Step 1: "click to open web link" (which seems to be the right one after some tests) and "Set web link target" (which does nothing for me, or I can not understand what it does and I would be happy if you can help me understand what it does).
Then, I have done some more tests with the "click to open web link" option, but I found some issues: firstly, with a link on an image of a Grid, the link is opened "correctly" as expected, but with a link on an image of a Gallery, the link is opened in a new tab and I really don't want that. So, perhaps it could be possible to change that or to add an option to be able to choose if the link has to be opened in a new tab or not?

Answer:

For both plugins:

To force the link opening at the same tab, in the "Set web link target", enter: _self

To force the link opening in a new tab, in the "Set web link target", enter: _blank

Read title and description from WordPress Media Library

Question:

I am using WonderPlugin Gallery. Regarding the CAPTIONS: is there a way to display the images captions that already exists in the WordPress Media Library? (and which are usually edited here)

(as i understand the concept of the wonderplugins the captions are driven and stored in a different database?)

Answer:

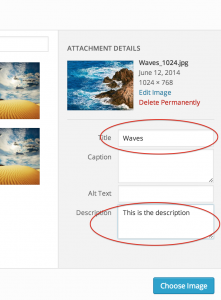
When you add an image from Media Library, it will use "title" in the Media Library as the title, and use "description" in the Media Library as the description.

After the image is added from Media Library, any change in the Media Library will NOT be reflected into the gallery.

WordPress Gallery Media Library

Allow Editors access the WordPress gallery plugin

Question:

I have recently discovered and tried WonderPlugin Gallery and it is clearly the best gallery plugin that I have ever tried. So, thanks a lot for a such plugin. However, I found a quite annoying issue: it is not possible to handle galleries using a non-administrator account, so users with "editor" rights can not create nor modify galleries. Therefore I would like to know if you plan to add a such feature in a near future?

Answer:

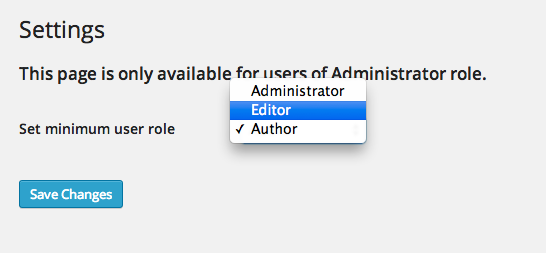
This feature is supported in new version 1.6.

In the Settings page, you can you can set the minimum user role to Administrator, Editor or Author.

WordPress Gallery User Roles