How to add a slider to WordPress theme and create a full width slider

It's easy to create a full width slider if your WordPress theme has a full width layout. Just adding a responsive full width slider to the page content, the slider will be full width automatically.

But if the WordPress theme has a boxed layout, that's, the page content is not full width, the main wrapper has a maximum width limit and has paddings around it, if you add the slider to the page content, since the page is not full width, by default, the slider is limited to the page and will also be boxed.

This tutorial will guide you how to create a WordPress full width slider even in a WordPress theme of boxed layout. There are 3 steps in this tutorial:

  • Step 1 - Install Wonder Slider
  • Step 2 - Create a full width slider
  • Step 3 - Publish the slider

At the end of this tutorial, we will create a WordPress full width slider as demonstrated in the following page: WordPress Full Width Slider.

We will also discuss how to directly add the slider PHP code to your WordPress theme if it's required in some cases.

  • Additional - Add the slider PHP code to WordPress theme file
Continue reading

Moving WordPress to a New Domain

Products:

WonderPlugin Slider, WonderPlugin Gallery, WonderPlugin Portfolio Grid Gallery, WonderPlugin Carousel and WonderPlugin Audio Player

Tutorial:

When you move your WordPress to a new domain name, you many find the image, video and audio links in the plugins are not updated, they still point to the old domain name. This tutorial will guide you how to update the links and fix the problem.

Continue reading

I upgraded to commercial version, but the free version watermark remains

Product:

All Wonder Plugins

Question:

I purchased the commercial version and have received my membership login password. I downloaded the commercial version and followed the upgrade instructions as posted on your website, however, the free version watermark remains.
Continue reading

How to convert video to HTML5 compatible MP4 format

This tutorial will show you how to convert a video file to HTML5 compatible MP4 format.

MP4 format is supported by Chrome, Safari, Firefox, Opera, Microsoft Edge, iPhone, iPad, Android and Flash. In this tutorial, we use the freeware Handbrake http://handbrake.fr/ to convert the video to HTML5 compatible MP4 videos.

You can use the WordPress plugin Wonder Gallery to play the video or create a video gallery in WordPress or the plugin Wonder Lightbox to play the video in a lightbox popup.

Step 1 - Download Handbrake

Handbrake http://handbrake.fr/ is an open source, GPL-licensed application for encoding MP4 video. It works on Windows, Linux and Mac. It has a graphic interface which is straightforward and easy to use.

Step 2 - Convert the video to MP4 format with Handbrake

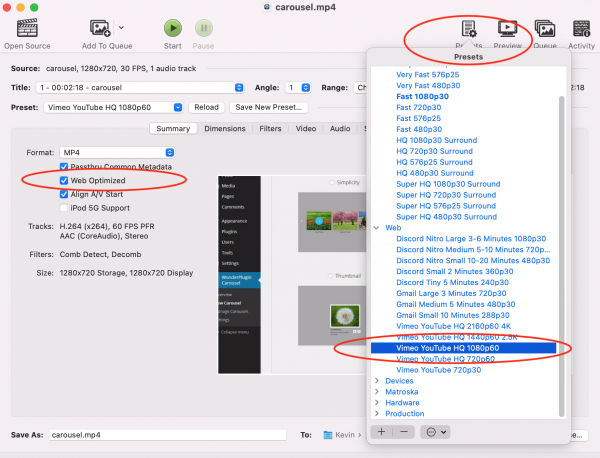
In the main dialog of Handbrake, click the Open Source button and select a video file.

handbrake

click to enlarge the image

On the top right of the dialog, click the button Presets. In the Presets menu, you can select the option Web -> Vimeo YouTube HQ 1080p60, Vimeo YouTube HQ 720p60 or Vimeo YouTube 720p30 or other options that suit your needs.

If you change the default options, make sure you check the option Web Optimized. The option is also known as "Fast start" or "Progressive downloading". It places the video header at the start of the file and allows your video to start playing while it's still downloading.

If the video playback is choppy when you select the preset Vimeo YouTube HQ 1080p60, you can also try the preset General> -> Fast 1080p30. Make sure you check the option Web Optimized after you select this preset.

At the bottom of the dialog, select a folder to save the converted video file.

Click Start and wait for the encoding complete.

How to Install and Upgrade to the Pro Version Without Losing Existing Work

After purchasing the Pro version, a membership account will automatically be created for you, and your login information will be sent to your email address within minutes. Upon receiving the login details, please log in to the Membership Area and download the Pro version.

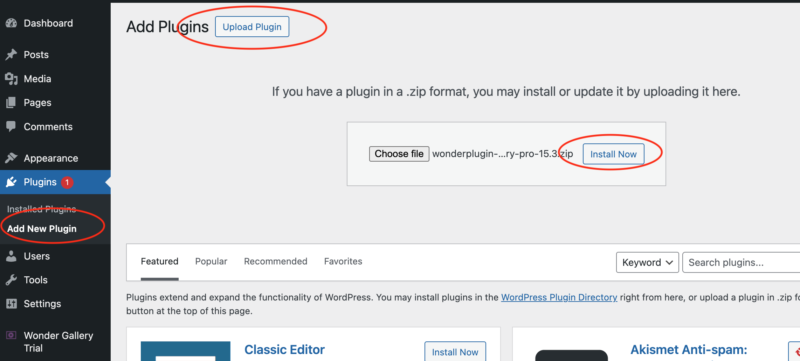
To upgrade to the Pro version, in your WordPress backend, navigate to the left menu Plugins -> Add New Plugin, click the Upload Plugin button, select the downloaded plugin .zip file, and click the Install Now button.

upload-plugin

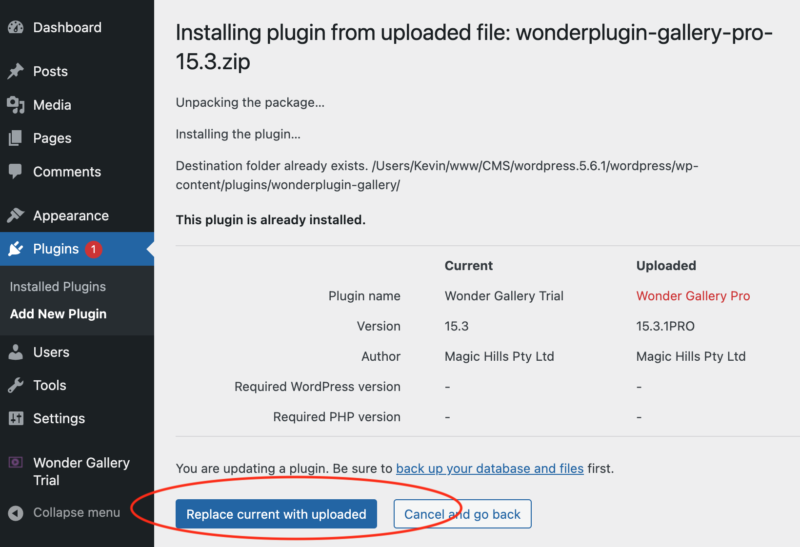
On the following page, click the 'Replace current with upload' button and wait for WordPress to complete the installation. The plugin will be upgraded to the Pro version once the installation has finished.

replace-with-pro-version

If you encounter any problems while upgrading the plugin, you can download the Pro version and then manually upgrade the plugin by following this tutorial: How to manually upgrade the plugin without losing existing work.