Centring WordPress jQuery slider

Question:

I have uploaded one of your sliders on to my WordPress website that I am building for my company and I can't seem to work out how to centre it on the page.

I hope you can help me out.

Answer:

WonderPlugin Slider sets its margin-left and margin-right properties to auto, so it will center itself to its container by default.

If for some reason it does not center on your webpage, you can try to place the slider inside another div, then center the div, for example, you can use code as following:

<div style="width:100%;text-align:center;">
<div style="width:400px;margin:0 auto;">
[[wonderplugin_slider id="37"]]
</div>
</div>

In the above code, the outer div has a width property 100%, it will have the same width as your webpage.

The inner div should have the same width as your slider. The width value can be pixels, for example "400px", or in percent, for example "80%". Its margin property "0 auto" will place the inner div to the center of the outer div.

Macro for link target in WordPress Carousel plugin

Question:

We are following the tutorial: https://www.wonderplugin.com/wordpress-carousel/add-weblink-in-wordpress-carousel-content-template/

Is there a macro for the link target field? There are somethings we want _self and there are somethings we want _blank.

Answer:

Please upgrade the plugin to Version 3.0. The version 3.0 adds a macro __TARGET__.

Then in step 3, Options tab, Content template, you can use the __TARGET__ for the link target value you defined for each slide in step 1.

<div class="amazingcarousel-image">__IMAGE__</div>
<div class="amazingcarousel-title">__TITLE__</div>
<p class="amazingcarousel-readmore"><a href="__HREF__" target="__TARGET__">Read More</a></p>

A demo is as following:

Moving WordPress hosting

Question:

We moved hosting for a website that we were using the WonderPlugin Carousel. The carousel information was lost in the transfer.

I still have access to the old server files. Is there a place where I can go and find the old carousel files and copy them over to the new host? Or am I screwed and have to rebuild all of them?

Answer:

The carousel information are saved in the WordPress database, the table name is wp_wonderplugin_carousel.

If you move your database together with your website files, then it's supposed to work fine.

Actually, WordPress is database driven. Most of your website content are saved in the WordPress database, for example, the posts and pages content. So if you move the hosting, you need to move the database together with the files.

You can view the official document about how to move WordPress: http://codex.wordpress.org/Moving_WordPress

Show the carousel above the gallery

Question:

I've just found out about your Photo & Video Gallery recently and I absolutely love it. I'm considering buying the commercial licence but before I do, I want to check with you about a feature that I can't figure out.

I am using the skin Gallery. In Gallery Options, there's a 'Show Thumbnail Carousel" checkbox, which only shows the carousel below the main display. I would love to have the carousel above it, but I don't see an option for that. Is this possible at all, perhaps through CSS? Thanks for your help and looking forward to hearing from you.

Continue reading

How to add link to WonderPlugin Slider description

Question:

What I’m trying to do is add a link to the slider where the description is, I need like a learn more link.

Answer:

To add a link in the description, you can directly enter HTML code

For example, you can enter the following text to the description field:

This is the description of WonderPlugin Slider. <br /><a href="https://www.wonderplugin.com" target="_blank">Learn More</a>

In the above code, <br /> adds a line break to the description, the a tag adds a link to the description.

You can also use css to specify the font color and size of the link, for example:

This is the description of WonderPlugin Slider. <br /><a href="https://www.wonderplugin.com" target="_blank" style="color:#990000;font-size:16px;">Learn More</a>

A demo is as following:

Change Image Radius of WordPress Carousel

Question:

I need to change the picture radius value to get a perfect square…how do I have to get this. I am using the skin Simplicity.

Answer:

In Step 3, Options tab, click Skin Options button, then find the following code, and remove the red text:

#amazingcarousel-CAROUSELID .amazingcarousel-image img {
    display: block;
    width: 100%;
    max-width: 100%;
    border: 0;
    margin: 0;
    padding: 0;
    -moz-border-radius: 4px;
    -webkit-border-radius: 4px;
    border-radius: 4px;
    -moz-box-shadow: 0 1px 4px rgba(0, 0, 0, 0.2);
    -webkit-box-shadow: 0 1px 4px rgba(0, 0, 0, 0.2);
    box-shadow: 0 1px 4px rgba(0, 0, 0, 0.2);
}

Edit Titles of Video in WordPress Video Gallery

Questions:

Hello,

we have a small problem with your plugin.

All titles of our added YouTube videos are not showing in the
gallery on the website.

It shows the title of the picture file of the chosen video and not
the title that we put in the WordPress backend on "title".

Answer:

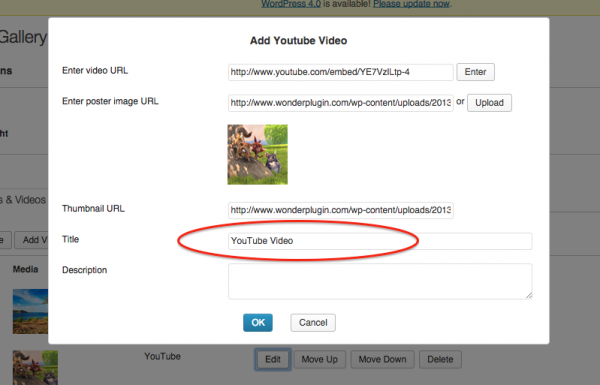
In the plugin, Step 1, Images & Videos tab, when you add/edit the video, you can edit the title to whatever you like.

edit-video-title

Change title font size of WordPress Gallery

Question:

I am working for my client to build a WP site and they have purchased the Wonderplugin Video Gallery Commercial plugin. I have activated it and want to reduce the text size in the Title. I have attached a screengrab to this email, as the site is on a test site and cannot be viewed by anyone but me yet. Can you please let me know what to do?

Answer:

In Step 3, Options tab, click Advanced Options button, then enter the following text to the Advanced Options field:

data-titlecss="{color:#ffffff; font-size:12px; font-family:Armata, sans-serif, Arial; overflow:hidden; white-space:normal; text-align:left; padding:10px 0px;}"
data-descriptioncss="{color:#ffffff; font-size:10px; font-family:Armata, sans-serif, Arial; overflow:hidden; white-space:normal; text-align:left; padding:0px 0px 10px 0px;}"

A demo is as following: