Add extra information to the player tracklist

Question:

I like the WonderPlugin Audio very much and I uses it on our site. However I have the following question:

I use the skin: Jukebox version but I am missing one column at the end of each inserted Audio line.

The missing element is to be able to add a document (doc. or PDF file) to that audio line. In that document could be the music (notes), or the words of the song or additional information like the writer and some background information.

The new audio line will look like: sequential number, song title, minutes:seconds, a symbol like open book or name.

In order to define the document file name we need an additional line to add the URL when defining the new Audio file.

My Question: Is that possible now or in the future, Please?

Answer:

Firstly, please upgrade to the latest version if your version number is less than 1.4.

Then you can take the following steps:

1. In the plugin, Step 1, MP3 tab, enter your link to the Information text field, for example:

<a href="https://www.wonderplugin.com/" target="_blank">WonderPlugin</a>

You can add different link text for each of your audios.

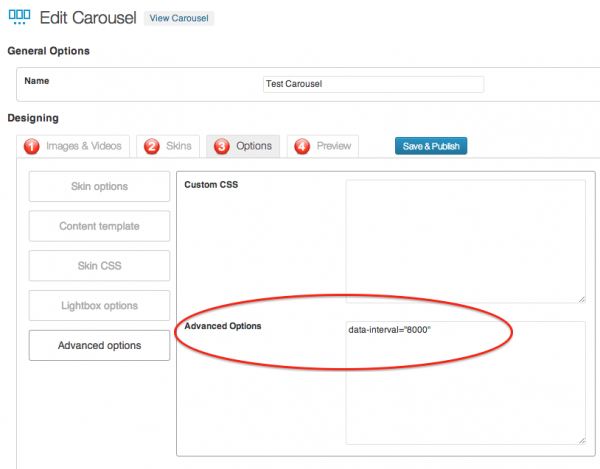
2. In Step 3, Options tab, Advanced Options, enter the following text to the Advanced options field:

data-infoformat="%ARTIST% %ALBUM%"
data-tracklistitemformat="%ID%. %TITLE% <span style='position:absolute;top:0;right:0;'>%INFO% - %DURATION%</span>"

In above code, the %INFO% will be dynamically replaced by the information you entered.

A demo is as following:
Display description in Lightbox of WordPress Grid Gallery

Question:

I was wondering if there was an Advanced Option allowing the data-description field to be displayed on the Lightbox when an image is clicked in the Grid Gallery?

Answer:

Please upgrade to the latest version if your version number is below 1.2.

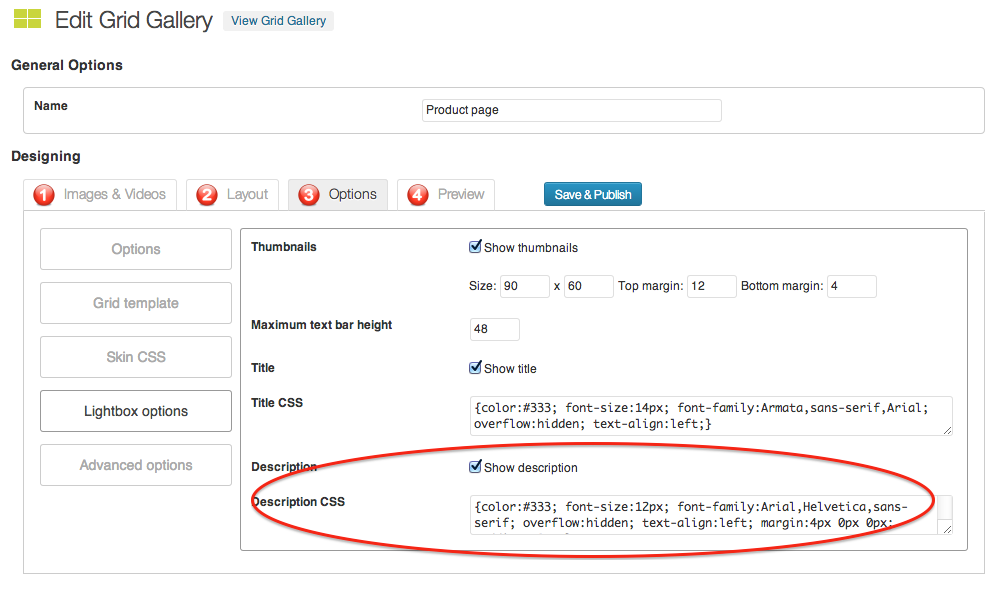
In the plugin, Step 3, Options tab, click "Lightbox Options", you can choose whether to display the description, you can also change the font and style by modifying the CSS code.

WordPress Grid Gallery Lightbox

Hide Lightbox Navigation Arrows

Question:

Hi there,

Is there any code I can use within the script when calling a lightbox to disable the navigation arrows?

As Lightbox cannot auto detect connection speed of the computer accessing my site, I have created a lightbox with a gallery on it underneath that’s a bit of a workaround. When a thumbnail (play video) image is clicked on in my page, lightbox launches with an image. I have made a gallery that displays under the image to either stream HD content, SD content or Low Res content. Works great, but the navigation arrows appear when you hover over the video. I just want to remove these on the video light boxes, but not on the photo ones I have running elsewhere on the site, so I’m not looking for a universal code, just something in the script that calls the lightbox like “navarrows=false” or something like that.

Is that possible?

Many thanks for the help!

Answer:

If you want to hide the arrows on specific pages, you can add the following CSS code to these pages:

<style type="text/css">
#html5-prev {
  display: none !important;
}
#html5-next {
  display: none !important;
}
</style>

Disable right click on HTML5 video

Product

WonderPlugin Gallery

Question:

I need to deactivate the functionality which occurs when you right click on a video. It gives you the option to ‘download video’ I need to turn this off for copyright reasons. I know there are always ways and means to download video content if you want it badly enough, but having a download option when you right click is something I really need to turn off!

Answer:

The right click menu is a function of the web browser. To disable it, in WonderPlugin Gallery plugin, edit the gallery, in step 3 Options tab, Advanced Options, add the following code to Custom JavaScript input box:

jQuery(document).ready(function(){
   jQuery('body').on('contextmenu', 'video', function() { return false; });
});

Change the gap between big picture and thumbnail navigation of skins with a vertical navigation carousel

Question:

* This question is for WordPress slider skin that has a vertical navigation carousel on the right side, for example: FeatureList, Vertical and VerticalNumber.

Yesterday I bought the enterprise version of the wonder plugin (slider).

I have the latest version of WordPress running.
I am really happy with the plugin, but i have one question.

Can i make the padding or the margin between the big picture and the thumbnails smaller?
I have enclosed an screenshot. Where the arrow points the space must be altered.

Thanks for your time.

Answer:

Firstly, please check whether you are using Version 1.7 or above, if not, please goto your membership area and download the latest version.

To change the margin between the big picture and right side navigation carousel:

In Step 3, Options tab, Advanced Options, enter the following text in the Advanced Options field:

data-navmarginx="1"

How to convert video to HTML5 compatible MP4 format

This tutorial will show you how to convert a video file to HTML5 compatible MP4 format.

MP4 format is supported by Chrome, Safari, Firefox, Opera, Microsoft Edge, iPhone, iPad, Android and Flash. In this tutorial, we use the freeware Handbrake http://handbrake.fr/ to convert the video to HTML5 compatible MP4 videos.

You can use the WordPress plugin Wonder Gallery to play the video or create a video gallery in WordPress or the plugin Wonder Lightbox to play the video in a lightbox popup.

Step 1 - Download Handbrake

Handbrake http://handbrake.fr/ is an open source, GPL-licensed application for encoding MP4 video. It works on Windows, Linux and Mac. It has a graphic interface which is straightforward and easy to use.

Step 2 - Convert the video to MP4 format with Handbrake

In the main dialog of Handbrake, click the Open Source button and select a video file.

handbrake

click to enlarge the image

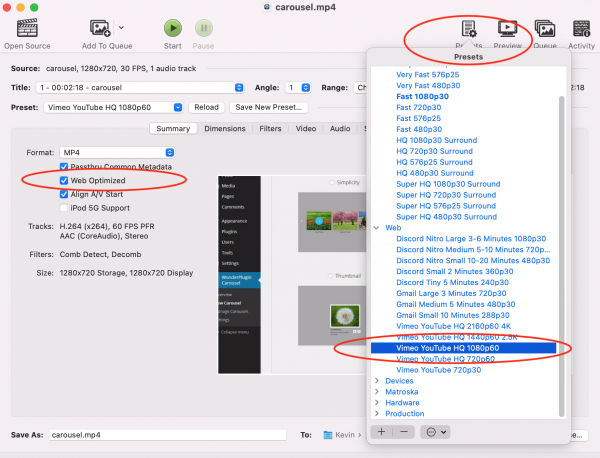
On the top right of the dialog, click the button Presets. In the Presets menu, you can select the option Web -> Vimeo YouTube HQ 1080p60, Vimeo YouTube HQ 720p60 or Vimeo YouTube 720p30 or other options that suit your needs.

If you change the default options, make sure you check the option Web Optimized. The option is also known as "Fast start" or "Progressive downloading". It places the video header at the start of the file and allows your video to start playing while it's still downloading.

If the video playback is choppy when you select the preset Vimeo YouTube HQ 1080p60, you can also try the preset General> -> Fast 1080p30. Make sure you check the option Web Optimized after you select this preset.

At the bottom of the dialog, select a folder to save the converted video file.

Click Start and wait for the encoding complete.

One MP4 format to play in all web browsers and devices

Product:

Wonder Gallery

Question:

Can I only use one mp4 video format to play in all web browsers?

Answer:

Yes, with our WordPress gallery plugin Wonder Gallery, you only need to provide one mp4 format to play in all web browsers and devices.

In iPhone, iPad, Android, Chrome, Safari, Firefox, Opera, IE 10 and above, the gallery plugin will use HTML5 to play the mp4 video.

In legacy web browsers, for example, Internet Explorer 8 and 9, the gallery plugin will use Flash to play the mp4 video.

If your mp4 video does not play in the web browsers and devices, it's probably because the video is not HTML5 compatible. You can view this tutorial to convert the video file to HTML5 compatible: How to convert video to HTML5 compatible.

Change Skin of WordPress Slider

Question:

I have a problem with my Slider plugin on a site I am working on.

I built a slider. I have played around with different skins on the slider. When I changed skins however, the change does not show on the live webpage.

If I remade the same slider: completely started over, using same photos and the vertical skin. It looks perfect as you can see on site.

My problem is I don't seem to be able to switch skins after I have made a slider and make the slider look right on the website. It seems as the options are not resetting allowing me to remake the slider.

Answer:

After you make change to the slider and before test it on your webpage:

1. Clear caches of your WordPress if you have a cache plugin installed.
2. Clear caches of your web browser before re-testing.