Customize the WonderPlugin Slider Text Navigation Skin

Product:

WonderPlugin Slider

Question:

I just purchased the wonder plugin slider. It's great but I just have one question.

I am using the 'wordpress slider with text navigation' option. I was wondering if there was a way of changing that background red colour and the dark grey to my custom colours?

https://www.wonderplugin.com/wordpress-slider/examples/wordpress-slider-with-text-navigation-id33/

I have inspected the code and there doesn't seem to be a class I can associate a colour with.

Would really appreciate your help!

Answer:

In the plugin, step 3, Options tab, Advanced Options, you can enter the following text to the Data Options field:

data-navbordercolor="#dfdfdf"
data-navborderhighlightcolor="#a8162b"
data-navthumbtitlecss="display:block;position:relative;padding:14px;text-align:center;font-size:12px; text-transform:uppercase;color:#231f20;"
data-navthumbtitlehovercss="color:#fff;"
data-navshowfeaturedarrow="false"
data-timercolor="#dfdfdf"

The 1st line data-navbordercolor will change the background color of the thumbnail navigations.
The 2nd line data-navborderhighlightcolor will change the highlight color.
The 3rd line data-navthumbtitlecss can be used to change text size and format.
The 4th line data-navthumbtitlehovercss is to change to the text color of highlighted tabs
The 5th line data-navshowfeaturedarrow is to hide the red arrow.
The 6th line data-timercolor is to change the color of the bottom progress line.

The demo is as following:

Centring WordPress jQuery slider

Question:

I have uploaded one of your sliders on to my WordPress website that I am building for my company and I can't seem to work out how to centre it on the page.

I hope you can help me out.

Answer:

WonderPlugin Slider sets its margin-left and margin-right properties to auto, so it will center itself to its container by default.

If for some reason it does not center on your webpage, you can try to place the slider inside another div, then center the div, for example, you can use code as following:

<div style="width:100%;text-align:center;">
<div style="width:400px;margin:0 auto;">
[[wonderplugin_slider id="37"]]
</div>
</div>

In the above code, the outer div has a width property 100%, it will have the same width as your webpage.

The inner div should have the same width as your slider. The width value can be pixels, for example "400px", or in percent, for example "80%". Its margin property "0 auto" will place the inner div to the center of the outer div.

How to add link to WonderPlugin Slider description

Question:

What I’m trying to do is add a link to the slider where the description is, I need like a learn more link.

Answer:

To add a link in the description, you can directly enter HTML code

For example, you can enter the following text to the description field:

This is the description of WonderPlugin Slider. <br /><a href="https://www.wonderplugin.com" target="_blank">Learn More</a>

In the above code, <br /> adds a line break to the description, the a tag adds a link to the description.

You can also use css to specify the font color and size of the link, for example:

This is the description of WonderPlugin Slider. <br /><a href="https://www.wonderplugin.com" target="_blank" style="color:#990000;font-size:16px;">Learn More</a>

A demo is as following:

Multiple jQuery loaded in WordPress

Question:

I have a website in progress, I used Wonderplugin for WordPress and as I came across on the development, I cannot get it working.

I already uploaded images and configured everything on WordPress.

I also copied the shortcode to the php page that I am working on. But the carousel does not show up.

Answer:

Normally this problem is that there are multiple jQuery files added to your WordPress.

You can view the HTML source code of your webpage, and check how many jQuery are added in your website. In Google Chrome, you can view the HTML source code with menu View -> Developer -> View Source, then search text "jquery" in the source code.

There should be only one jQuery in the webpage, which is added by the WordPress system.

Some plugins add their own jQuery to the website, and this is not correct. A plugin should always use the system installed jQuery, and the js files added from a plugin will be added after the system jQuery.

A jQuery will destroy all other jQuery functions that are added before it. So if a plugin adds its own jQuery, it may destroy other jQuery functions.

To fix the issue:

In the plugin, Setting menu, you can try to check the option "Add plugin js scripts to the footer". This option will place the plugin js file to the footer and will fix the problem in most cases.

If the above option is not working, you can try to disable all other plugins and see whether the WonderPlugin works. If it works, you can then enable the plugins one by one, and find the plugin that has caused the problem.

If WonderPlugin is still not working after you have disabled all other plugins, then the extra jQuery may have been added manually to the theme or the page, you need to find the code and remove it.

How to Manually Upgrade the Plugin Without Losing Existing Work

This tutorial guides you through the process of manually upgrading the plugin to a new version. You can follow these instructions to upgrade from the Free version to the Pro version, or to update either version to the latest release.

Before proceeding with the tutorial, we strongly recommend making a backup of your WordPress website.

There are two methods for manually upgrading the plugin to its latest version:

The First Method

There are 4 steps in this method:

Step 1 - Make sure the keep data option is enabled

In your WordPress backend, goto the left menu Plugin Name (e.g., Wonder Carousel, Wonder Slider, etc) -> Settings, make sure there is an option Keep data when deleting the plugin and the option is checked. The option is checked by default. If your current version is very old, it may not have this option. In this case, do not use this method, use the following second method instead.

Step 2 - Deactivate and delete the old version

In the WordPress backend, goto the left menu Plugins -> Installed Plugins, deactivate the plugin and delete it. When deleting the plugin, ignore the warning "Are you sure you wish to delete these files and data" and click the button "Yes, Delete these files and data". This is a standard warning from WordPress.

Step 3 - Install and activate the new version

In the WordPress backend, goto the left menu Plugins -> Add New, click Upload Plugin, select the downloaded new version plugin zip file, install and activate it.

Step 4 - Clear WordPress Caches

  • If you have installed a WordPress js/css minify plugin or WordPress cache plugin for example, Autoptimize, W3 Total Cache, WP Rocket, WP Fastest Cache, WP Super Cache, empty all caches from the plugin.
  • Some web hosts, for example, GoDaddy, WPEngine, SiteGround, DreamHost, will also cache web files. You need to clear caches of the web hosting before testing. Please contact your web hosting provider and ask about how to clear caches.
  • Clear caches of your web browser before testing

The Second Method

If you are using a very old version, you may need to use this method to upgrade the plugin. There are 3 steps in this method:

Step 1: Install the new version plugin via FTP

First please extract the new version plugin ZIP file to a folder on your computer, then upload the extracted Plugin folder to the wp-content/plugins folder in your WordPress FTP server.

When a ZIP file is extracted, some unzip software may add a parent folder outside of the Plugin folder. Please make sure you have uploaded the Plugin folder, not its parent folder.

If your WordPress already has an old version installed, make sure to overwrite the existing folder in the server. Or you can delete the old version files first then upload the new version files.
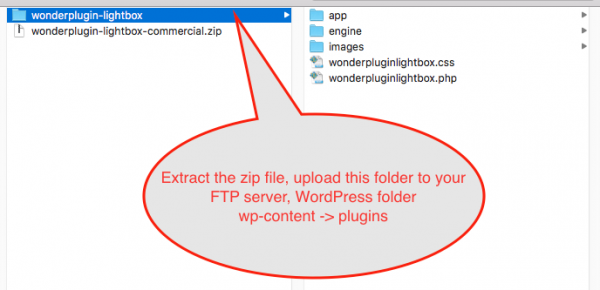
Step 2: Make sure the plugin is activated

In your WordPress backend, left menu, Plugins -> Installed Plugins, find the plugin from the list, make sure the plugin is activated. If it's not, click the Activate link.

Step 3 - Clear WordPress Caches

  • If you have installed a WordPress js/css minify plugin or WordPress cache plugin for example, Autoptimize, W3 Total Cache, WP Rocket, WP Fastest Cache, WP Super Cache, empty all caches from the plugin.
  • Some web hosts, for example, GoDaddy, WPEngine, SiteGround, DreamHost, will also cache web files. You need to clear caches of the web hosting before testing. Please contact your web hosting provider and ask about how to clear caches.
  • Clear caches of your web browser before testing

Change the gap between big picture and thumbnail navigation of skins with a vertical navigation carousel

Question:

* This question is for WordPress slider skin that has a vertical navigation carousel on the right side, for example: FeatureList, Vertical and VerticalNumber.

Yesterday I bought the enterprise version of the wonder plugin (slider).

I have the latest version of WordPress running.
I am really happy with the plugin, but i have one question.

Can i make the padding or the margin between the big picture and the thumbnails smaller?
I have enclosed an screenshot. Where the arrow points the space must be altered.

Thanks for your time.

Answer:

Firstly, please check whether you are using Version 1.7 or above, if not, please goto your membership area and download the latest version.

To change the margin between the big picture and right side navigation carousel:

In Step 3, Options tab, Advanced Options, enter the following text in the Advanced Options field:

data-navmarginx="1"

Change Skin of WordPress Slider

Question:

I have a problem with my Slider plugin on a site I am working on.

I built a slider. I have played around with different skins on the slider. When I changed skins however, the change does not show on the live webpage.

If I remade the same slider: completely started over, using same photos and the vertical skin. It looks perfect as you can see on site.

My problem is I don't seem to be able to switch skins after I have made a slider and make the slider look right on the website. It seems as the options are not resetting allowing me to remake the slider.

Answer:

After you make change to the slider and before test it on your webpage:

1. Clear caches of your WordPress if you have a cache plugin installed.
2. Clear caches of your web browser before re-testing.

Making the shadow underneath the slider larger

Question:

I have the commercial version of WonderPlugin Slider Plugin and am trying to make the shadow underneath the plugin appear larger on my homepage. I like how it sits down lower on your page but it seems to get lost on my page.

Answer:

In Step 3, Options tab, Advanced Options panel, enter the following text to the Advanced Options:

data-bottomshadowimagewidth="115"
data-bottomshadowimagetop="95"

The two options define the width and the top position of the underneath shadow (percentage compared to the image).