Add mp3 download link to audio player

Product:

Wonder Audio Player

Question:

How can I add download links to the player so my visitor can download the mp3 file?

Answer:

Updated on May 2020: Wonder Audio Player Version 9.6 added 6 skins to directly create audio players with download buttons and social media share buttons. Please view the following tutorial for how to use the new skins: WordPress audio player with download buttons and social media share buttons.

You can add download links to the player track list.

In the plugin, step 2 Skins dialog, please choose a skin that has a track list, then in step 3, Options tab, click the Advanced Options button, enter the following text to the Data Options field:

data-tracklistitemformat="%ID%. %TITLE% <span style='float:right;'><a href='%AUDIOURL%' class='wpaudiodownloadlink' download='%TITLE%.mp3' target='_blank' onclick='event.stopPropagation();'>Download</a></span>"

In the above code, %ID%, %TITLE% and %AUDIOURL% are predefined macro variables. They will be replaced by each audio id, title and audio URL dynamically.

An online demo is as follows:

How to Manually Upgrade the Plugin Without Losing Existing Work

This tutorial guides you through the process of manually upgrading the plugin to a new version. You can follow these instructions to upgrade from the Free version to the Pro version, or to update either version to the latest release.

Before proceeding with the tutorial, we strongly recommend making a backup of your WordPress website.

There are two methods for manually upgrading the plugin to its latest version:

The First Method

There are 4 steps in this method:

Step 1 - Make sure the keep data option is enabled

In your WordPress backend, goto the left menu Plugin Name (e.g., Wonder Carousel, Wonder Slider, etc) -> Settings, make sure there is an option Keep data when deleting the plugin and the option is checked. The option is checked by default. If your current version is very old, it may not have this option. In this case, do not use this method, use the following second method instead.

Step 2 - Deactivate and delete the old version

In the WordPress backend, goto the left menu Plugins -> Installed Plugins, deactivate the plugin and delete it. When deleting the plugin, ignore the warning "Are you sure you wish to delete these files and data" and click the button "Yes, Delete these files and data". This is a standard warning from WordPress.

Step 3 - Install and activate the new version

In the WordPress backend, goto the left menu Plugins -> Add New, click Upload Plugin, select the downloaded new version plugin zip file, install and activate it.

Step 4 - Clear WordPress Caches

  • If you have installed a WordPress js/css minify plugin or WordPress cache plugin for example, Autoptimize, W3 Total Cache, WP Rocket, WP Fastest Cache, WP Super Cache, empty all caches from the plugin.
  • Some web hosts, for example, GoDaddy, WPEngine, SiteGround, DreamHost, will also cache web files. You need to clear caches of the web hosting before testing. Please contact your web hosting provider and ask about how to clear caches.
  • Clear caches of your web browser before testing

The Second Method

If you are using a very old version, you may need to use this method to upgrade the plugin. There are 3 steps in this method:

Step 1: Install the new version plugin via FTP

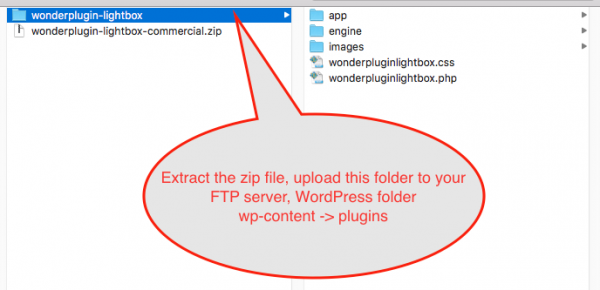
First please extract the new version plugin ZIP file to a folder on your computer, then upload the extracted Plugin folder to the wp-content/plugins folder in your WordPress FTP server.

When a ZIP file is extracted, some unzip software may add a parent folder outside of the Plugin folder. Please make sure you have uploaded the Plugin folder, not its parent folder.

If your WordPress already has an old version installed, make sure to overwrite the existing folder in the server. Or you can delete the old version files first then upload the new version files.
Step 2: Make sure the plugin is activated

In your WordPress backend, left menu, Plugins -> Installed Plugins, find the plugin from the list, make sure the plugin is activated. If it's not, click the Activate link.

Step 3 - Clear WordPress Caches

  • If you have installed a WordPress js/css minify plugin or WordPress cache plugin for example, Autoptimize, W3 Total Cache, WP Rocket, WP Fastest Cache, WP Super Cache, empty all caches from the plugin.
  • Some web hosts, for example, GoDaddy, WPEngine, SiteGround, DreamHost, will also cache web files. You need to clear caches of the web hosting before testing. Please contact your web hosting provider and ask about how to clear caches.
  • Clear caches of your web browser before testing

Not all audio files loading in Google Chrome

Question:

I purchased the commercial version of your audio plugin this morning and installed it on a client’s site who uses quite a few audio files. One page in particular contains 10 different audio files. I’m having a problem “loading” the last three audio files in Google Chrome on both a mac and pc. All the audio files work great in IE, Safari, and Firefox. They actually work fine on the chrome mobile application too.

Is there a setting that I need to change to get all the files to load when the page loads in Chrome?

Answer:

The problem is because Chrome has a maximum connection limit of html5 audios.

To fix the problem, in step 3, Options tab, Advanced Options, enter the following text to the Advanced Options tab:

data-preloadaudio="false"

With this change, the player will only load the mp3 file when required, and it will fix the problem.

Add extra information to the player tracklist

Question:

I like the WonderPlugin Audio very much and I uses it on our site. However I have the following question:

I use the skin: Jukebox version but I am missing one column at the end of each inserted Audio line.

The missing element is to be able to add a document (doc. or PDF file) to that audio line. In that document could be the music (notes), or the words of the song or additional information like the writer and some background information.

The new audio line will look like: sequential number, song title, minutes:seconds, a symbol like open book or name.

In order to define the document file name we need an additional line to add the URL when defining the new Audio file.

My Question: Is that possible now or in the future, Please?

Answer:

Firstly, please upgrade to the latest version if your version number is less than 1.4.

Then you can take the following steps:

1. In the plugin, Step 1, MP3 tab, enter your link to the Information text field, for example:

<a href="https://www.wonderplugin.com/" target="_blank">WonderPlugin</a>

You can add different link text for each of your audios.

2. In Step 3, Options tab, Advanced Options, enter the following text to the Advanced options field:

data-infoformat="%ARTIST% %ALBUM%"
data-tracklistitemformat="%ID%. %TITLE% <span style='position:absolute;top:0;right:0;'>%INFO% - %DURATION%</span>"

In above code, the %INFO% will be dynamically replaced by the information you entered.

A demo is as following:

Audio Player with Larger Image

Question:

I've downloaded the free version for testing, and I want to upgrade to the commercial version. However, before I buy, I want to know if

1. Can I change the size of the thumbnail in the Box player skin from 100x100 to something larger? I don't find this specified in your Skin CSS file, so not sure what the custom css would be.

2. If not, can the Lightbox skin show a playlist?

Thanks for your help. If I can use a larger image, I will purchase the plugin.

Answer:

All of the skins are fine tuned. If you change the size of the thumbnail in the player, you need to adjust CSS of other parts accordingly, which may be difficult.

But you can add a playlist to the Lightbox skin.

1. In the Step 3, Options tab, click Skin Options button, change the Height to Auto.
2. In the Step 3, Options tab, click Advanced Options button, then enter following text to the Advanced options:

data-showtracklist="true"

A demo is as following:

Open Audio Player in Fancybox

Question:

Im a new WordPress developer and developing a website for my client where client provided me "WonderPlugin Audio Player"

The requirement is that the player need to be play inside the fancy-box ,I implemented it but it generating few error and not playing the file.

TypeError: this.flashObject is null

...is.flashObject=AmazingSWFObject.getObjectById("amazingflashaudioplayer-"+this.id...

What I do in such a case please need help on this matter

Does the plugin support inside fancybox?

Answer:

You can try the following way to do it:

1. Download Amazing Audio Player application: http://amazingaudioplayer.com/. It has the same JavaScript core as WonderPlugin Audio Player and can create same players. But it's a Windows/Mac application.

2. Create your player in the application, in Publish dialog, choose "Publish to folder". This will create all files for the audio player.

3. Upload all of the files, including all of the subfolders, to your web server.

4. Use fancybox to open the file "audioplayer.html".

If you are an experienced WordPress developer, you can also do it with WonderPlugin Audio Player:

1. Create a special WordPress page template, which does not have the normal header and footer.

2. Create a WordPress page with the above template, then paste the audio player shortcode to this page. This will create a page with only the player inside.

3. Open the above page with fancybox, or with WonderPlugin Lightbox Plugin https://www.wonderplugin.com/wordpress-lightbox/.

Thumbnail Image for WordPress Audio Player

Question:

I've just installed this plugin for WordPress.

I'm having an issue with adding an image for an album of songs. For some reason, all I'm seeing is part of the background colour of the image. Does the image need to be a particular size?

The size of the actual image is 1024 by 1024. All I get is part of the white background and NOT the actual CD image.

Answer:

The plugin does not resize your image, so it just displays the top-left corner of your image, which is a white background.

Please resize your image to 100*100 with photoshop or any image resizing software, then add it to the plugin.

How to remove the numbers from before the track names of the Audio Player

Question:

So I checked out the free version of the audio player and I really like. What a great job you have done with this. Especially with the backend. It's very user friendly! I like it so much I started looking into your other plugins.

A question regarding support. I've made quite a few customizations to the CSS but there are a couple changes I would like to make but I can't seem to figure out. For example, I would like to remove the numbers from before the track names or add a little space between the number and the track name. Are these the kind of things you can help with or would I be on my own?

Another question is about your website. I love your website! Especially the way it works on mobile devices. Did you code it? Is it a wordpress site and if so what theme or framework did you start with? I just think it functions perfectly for my needs and I would be very interested in know a little more about it.

Answer:

In the player editor, Step 3, Options, click "Advanced Options", then in the right side, "Advanced options", enter:

data-tracklistitemformat="%TITLE% - %ARTIST% %DURATION%"

If you want to add back the number, it's:

data-tracklistitemformat="%ORDER%. %TITLE% - %ARTIST% %DURATION%"

We will add more options to the user interface in the future version.

Our website is based on WordPress, but it's not a commercial theme, it's coded by our developer.

Add more than 10 songs to WonderPlugin Audio Player

Question:

I can't view more than 10 songs on the jukebox player. I had 10 songs, then went back in and added 2 more songs to the player but it will only show the 10 songs. I cloned the player and saved it as another name, kind of tried everything but it only shows 10 songs. How can this be fixed?

Answer:

By default, there is a maximum limit of 10 audios on one page. If there are more than 10 audios, it will display left and right buttons on the top right of the play list, you can navigate the pages with the buttons.

To change the maximum value, in the plugin, edit the player, step 3 Options tab, click "Advanced options" button, the in the right "Advanced options" field, enter:

data-tracklistitem=20

This will change the maximum value to 20.